1 - Welcome
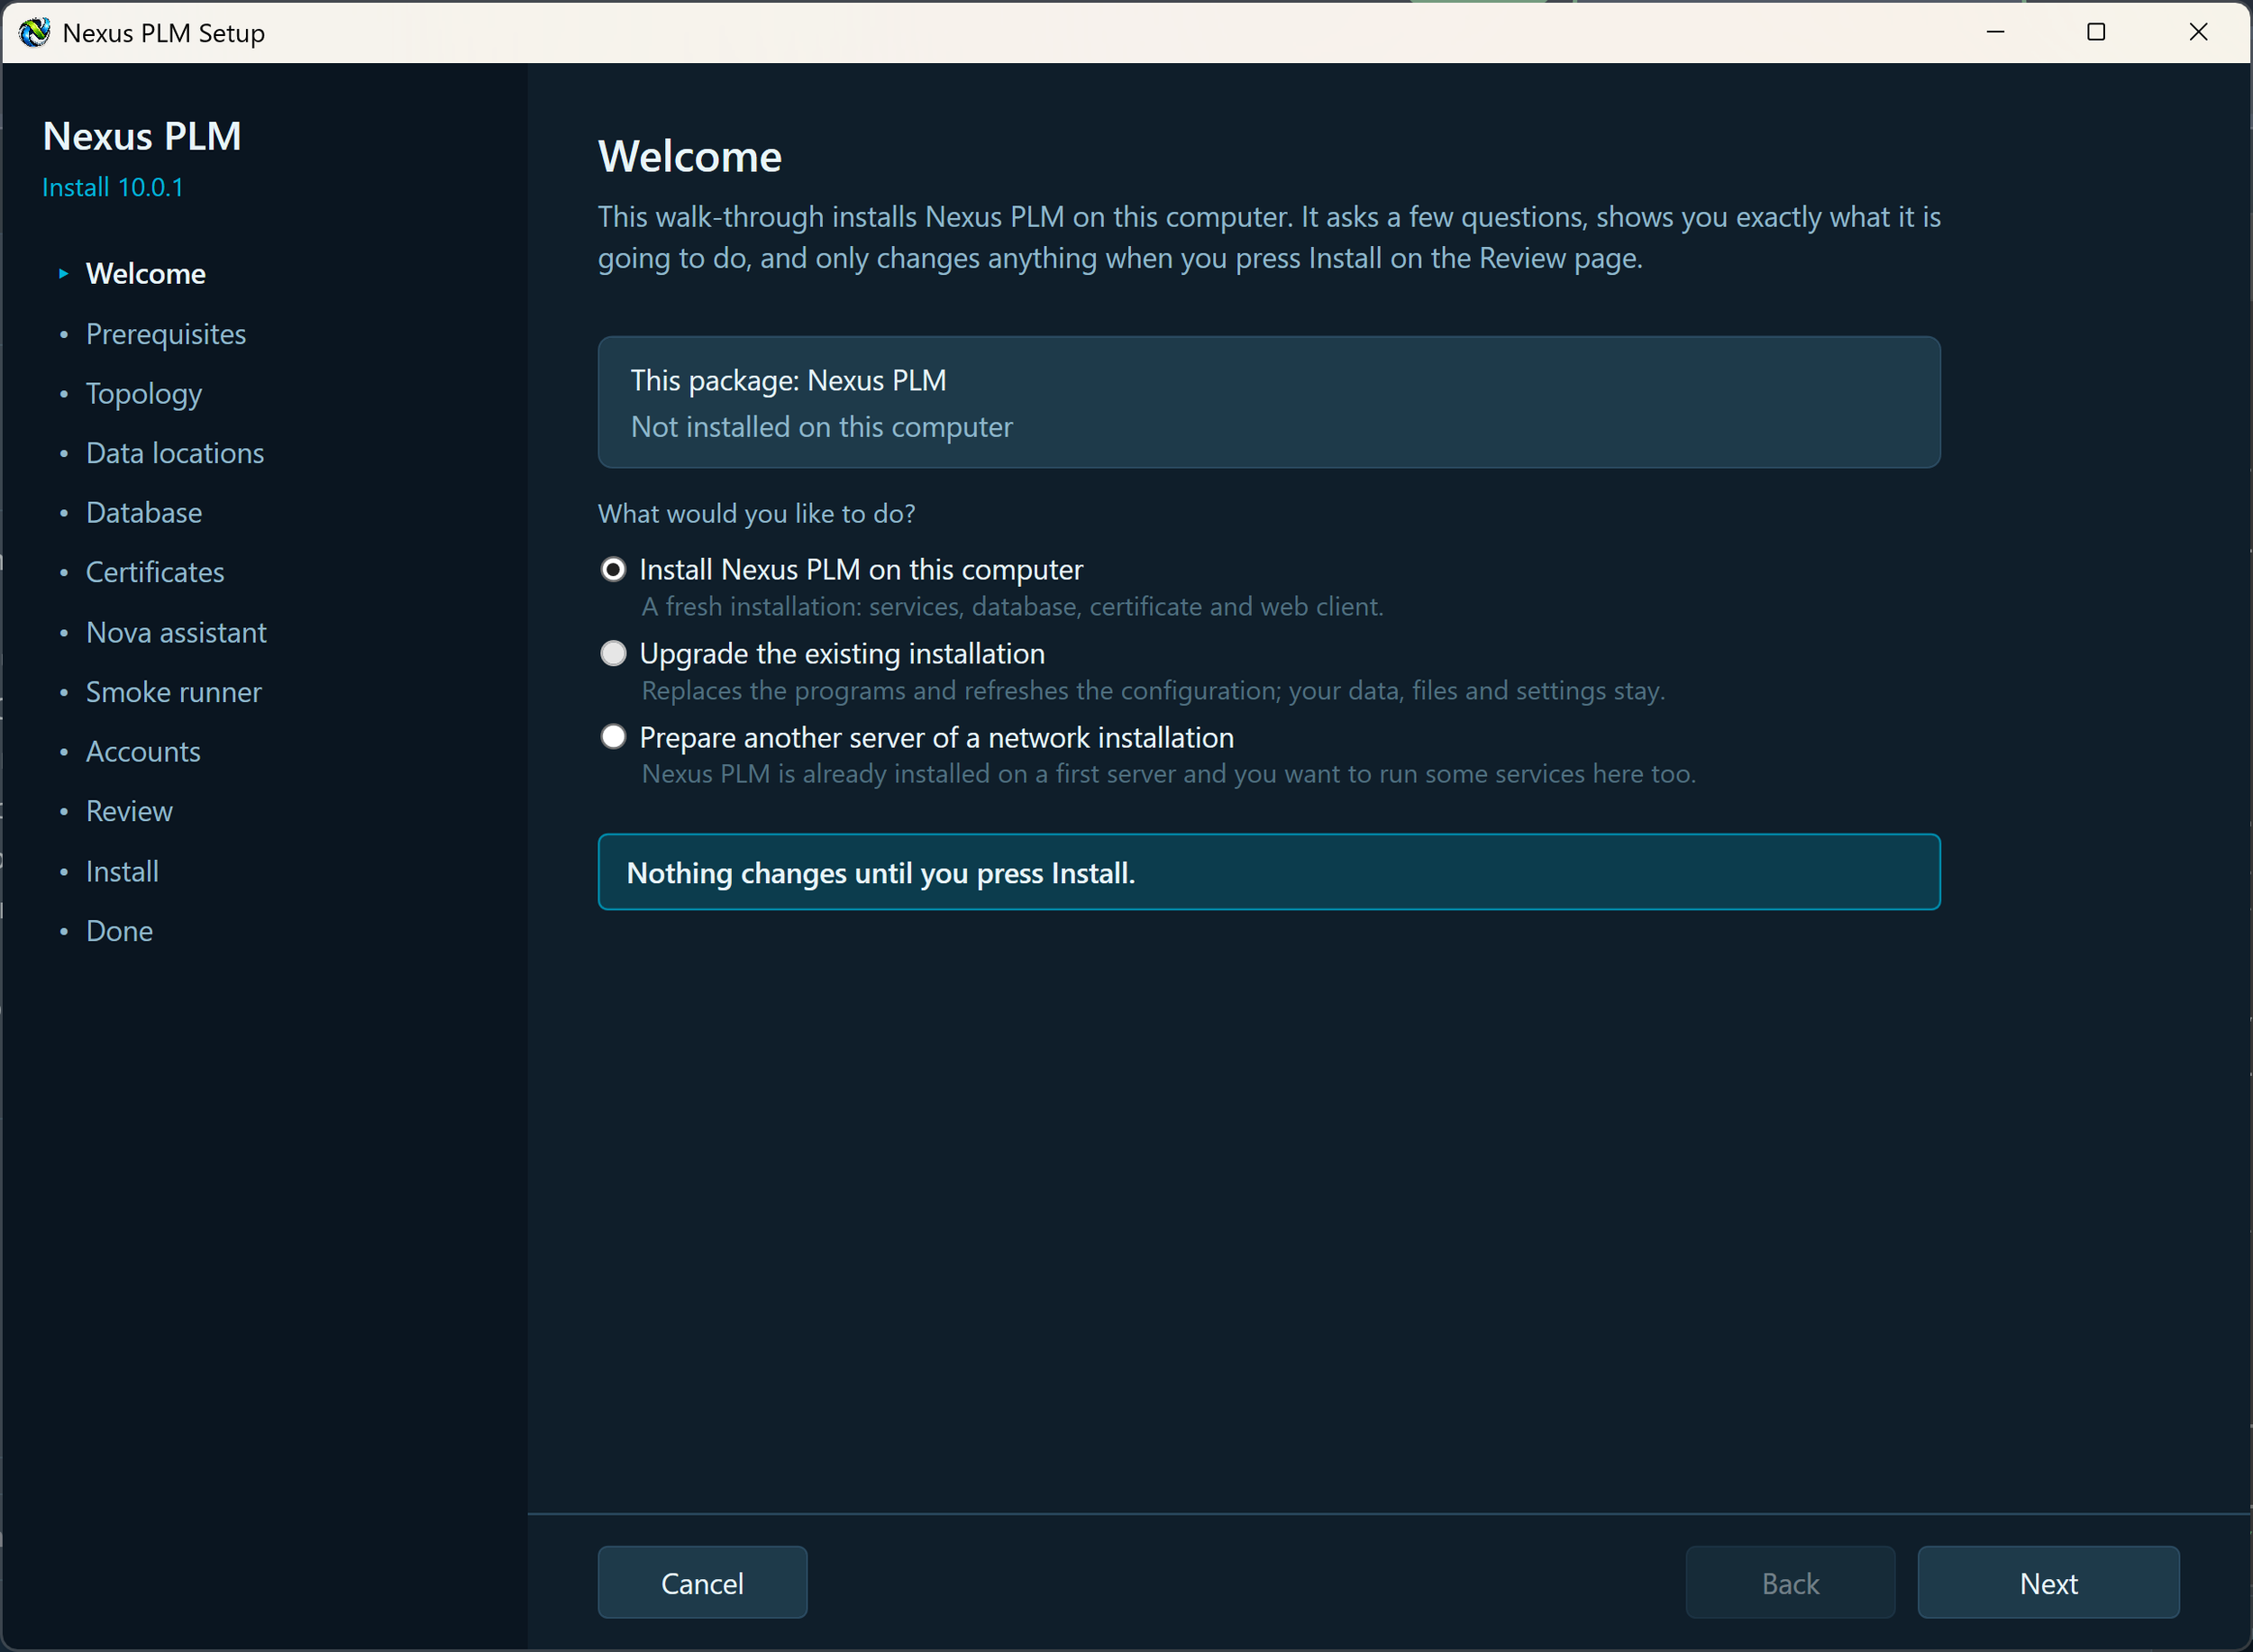
Starting the Nexus PLM Installation Welcome Screen.
The Welcome page says what Setup is about to do, and asks the one question that shapes the rest of the walk-through: is this a brand-new installation, an upgrade of one that is already here, or another computer joining an installation you already have?
Above the choices, Setup shows the version it is carrying and the version already on this computer, so you can see what you are about to change. Nothing on the computer is touched until you press Install on the Review page - every page before that only collects answers, and Cancel is safe at any point.
Install Nexus PLM on this computer. Choose this for a new server. Setup installs the services, prepares the database, issues a certificate and sets up the web client. It is chosen for you when no installation is found.
Upgrade the existing installation. Chosen for you when Setup finds Nexus PLM already installed here. The programs are replaced and the settings files are written again from your answers, so any setting added by the new release is there. Your data - vault files, search index, Nova’s data, types, numbering and workflows - is never touched.
Prepare another server of a network installation. Choose this on the second, third and later computers of a multi-server installation. Setup will ask for the shared secret shown on the Done page of the first server, which is what lets the services trust each other.
Make your choice and press Next.
If the version already installed is newer than the one in this package, close Setup and run the current installer instead.
If Setup says another copy is already running, close the other Setup or Manager window before you continue.
Installation - Welcome
2 - Prerequisites
What prerequisites do you need to install before your start.
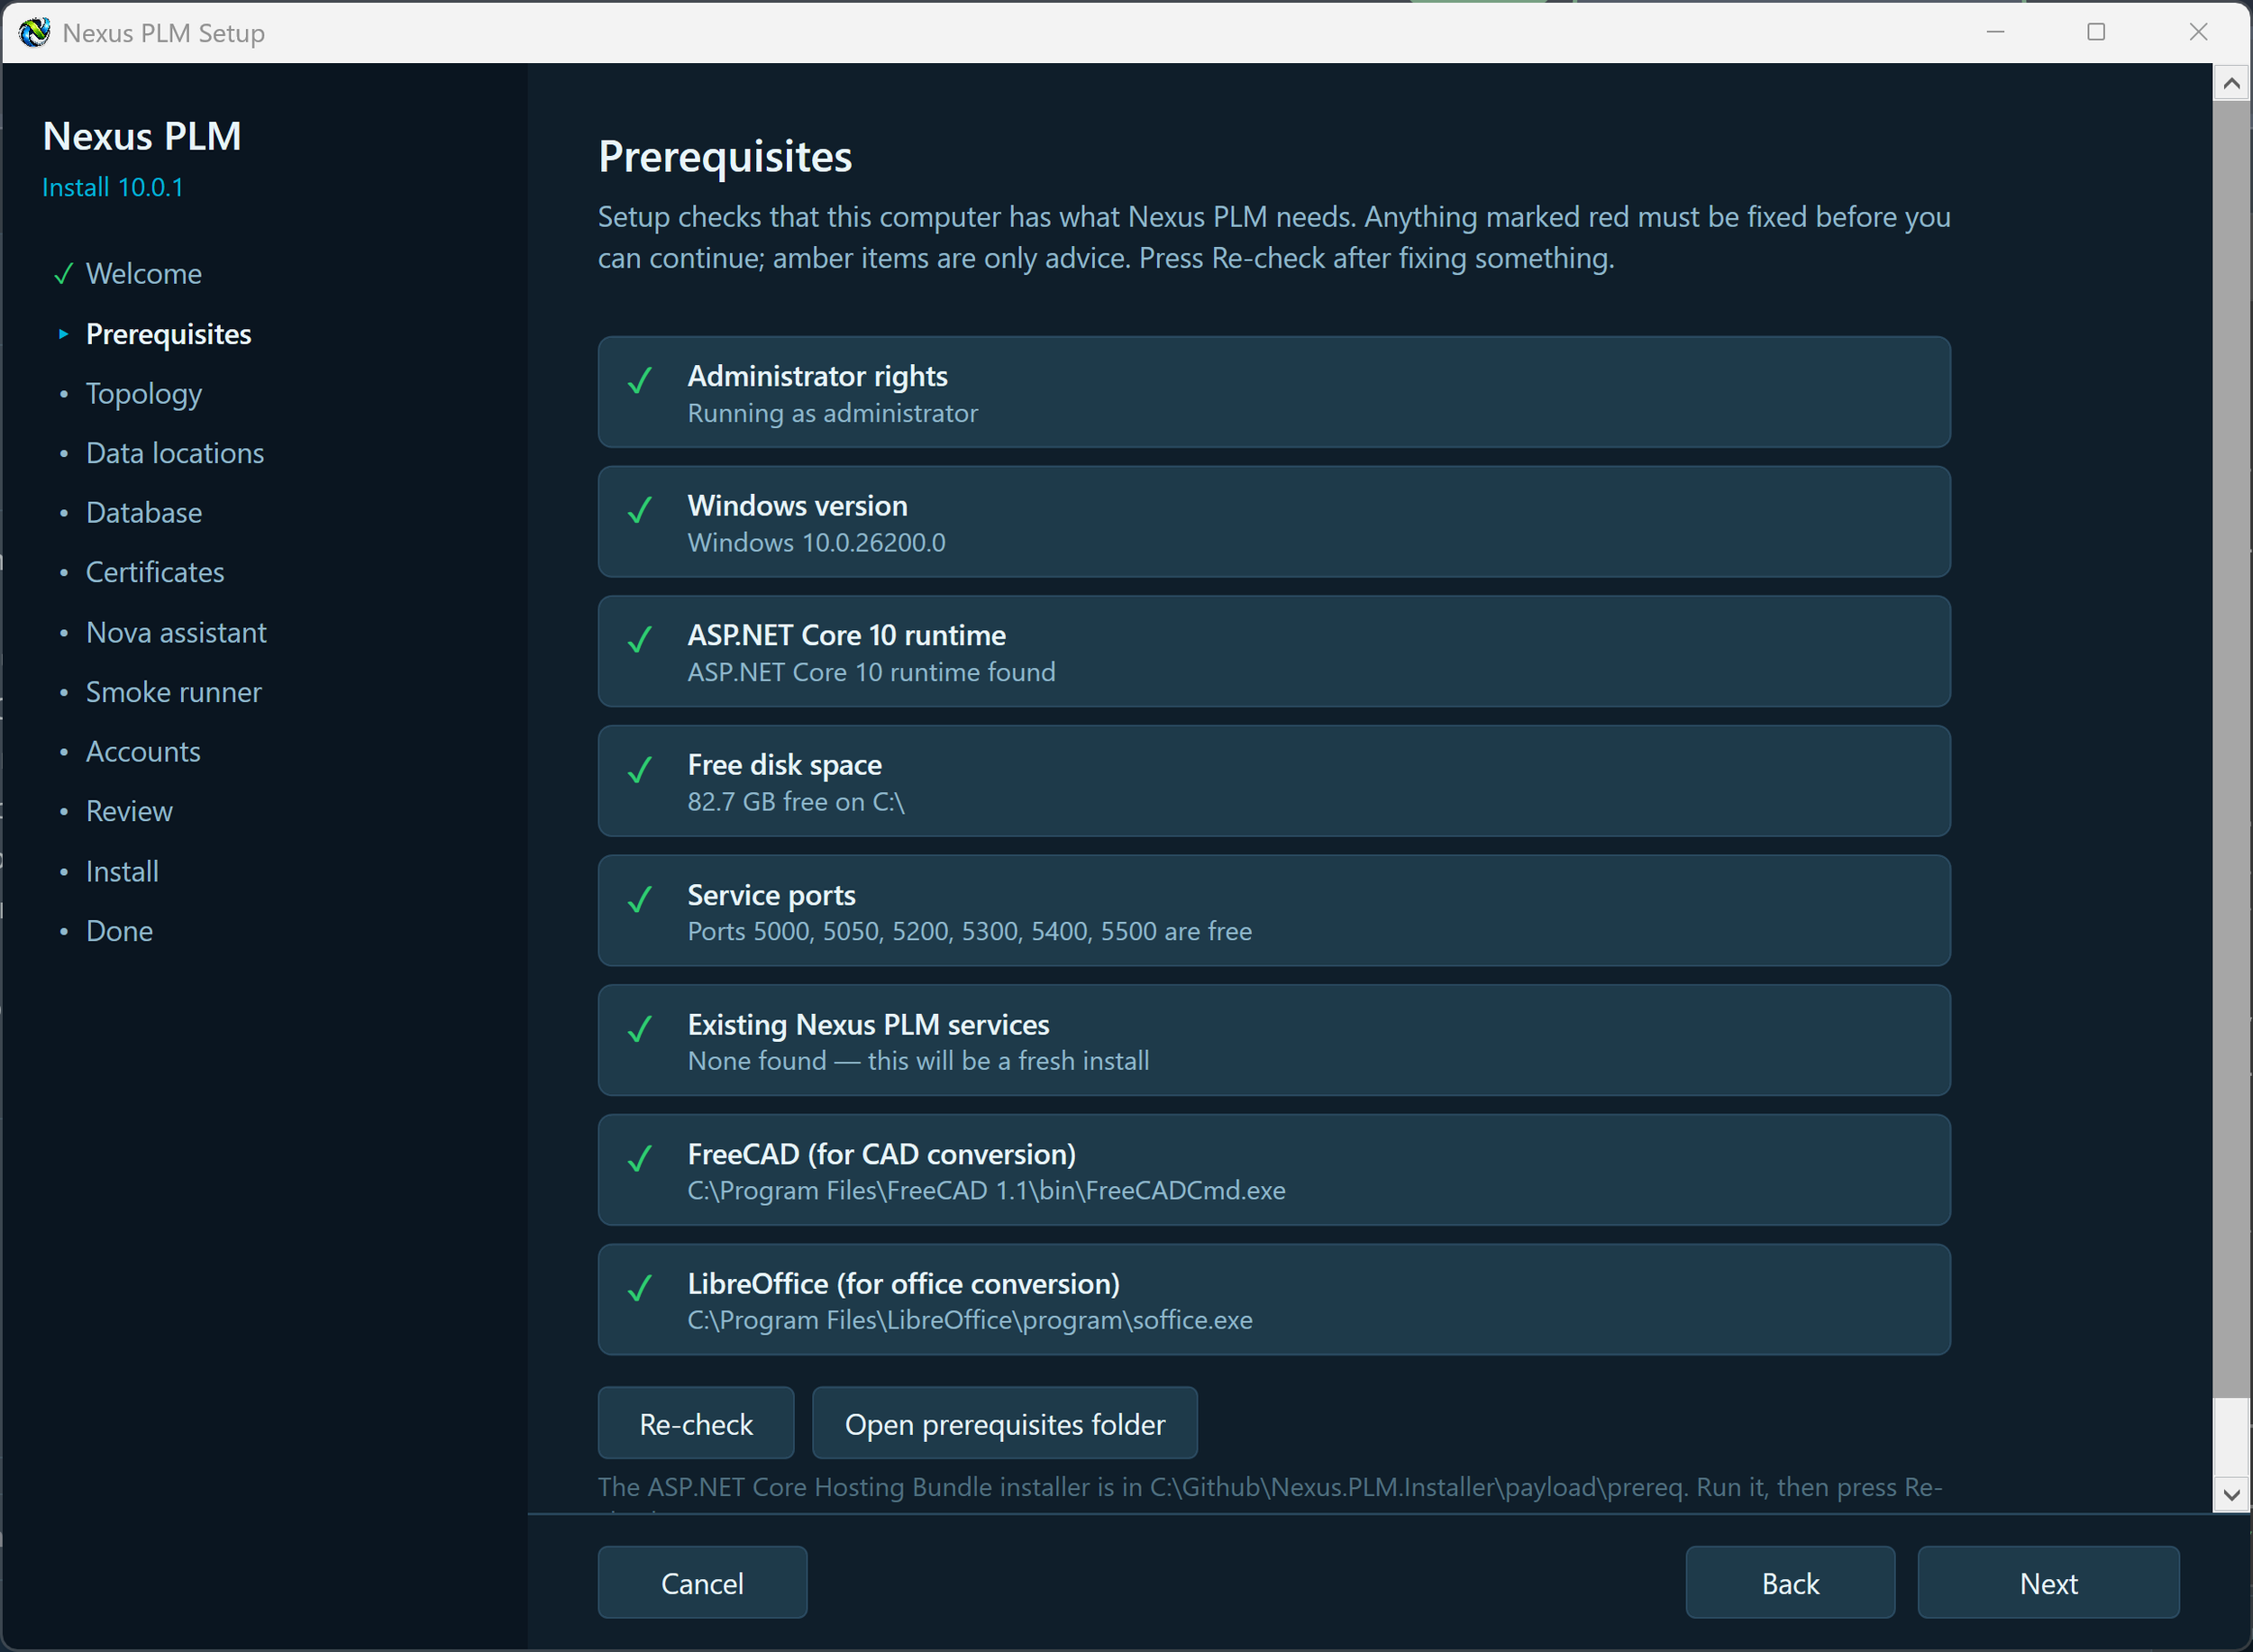
The Prerequisites page checks that this computer has everything Nexus PLM needs before anything is installed. Each row is a tick, an amber warning or a red cross with a short explanation. Red rows must be fixed before you can continue; amber rows only tell you what will not be available if you carry on.
Setup checks that you are running as an administrator, that the Windows version is supported, that there is enough free disk space, that the ASP.NET Core runtime is present, that the ports the services need are free, whether Nexus PLM services from an earlier installation already exist, and whether FreeCAD and LibreOffice are installed for document conversion.
If the ASP.NET Core runtime row is red, press Install now. Setup runs the Microsoft installer that is shipped inside this package, so nothing is downloaded, and re-checks the row when it finishes. After fixing anything outside Setup - freeing a port, freeing disk space, installing FreeCAD - press Re-check.
When no row shows a red cross, press Next.
Common fixes:
If you are not an administrator, close Setup, right-click it and choose Run as administrator.
If a port is in use, either stop the program using it or give that service a different port on the Topology page. FreeCAD and LibreOffice missing is only a warning - everything works except conversion of CAD and office documents, and you can install them later.
Installation Prerequisites
3 - Topology
Defining the Installation Topology.
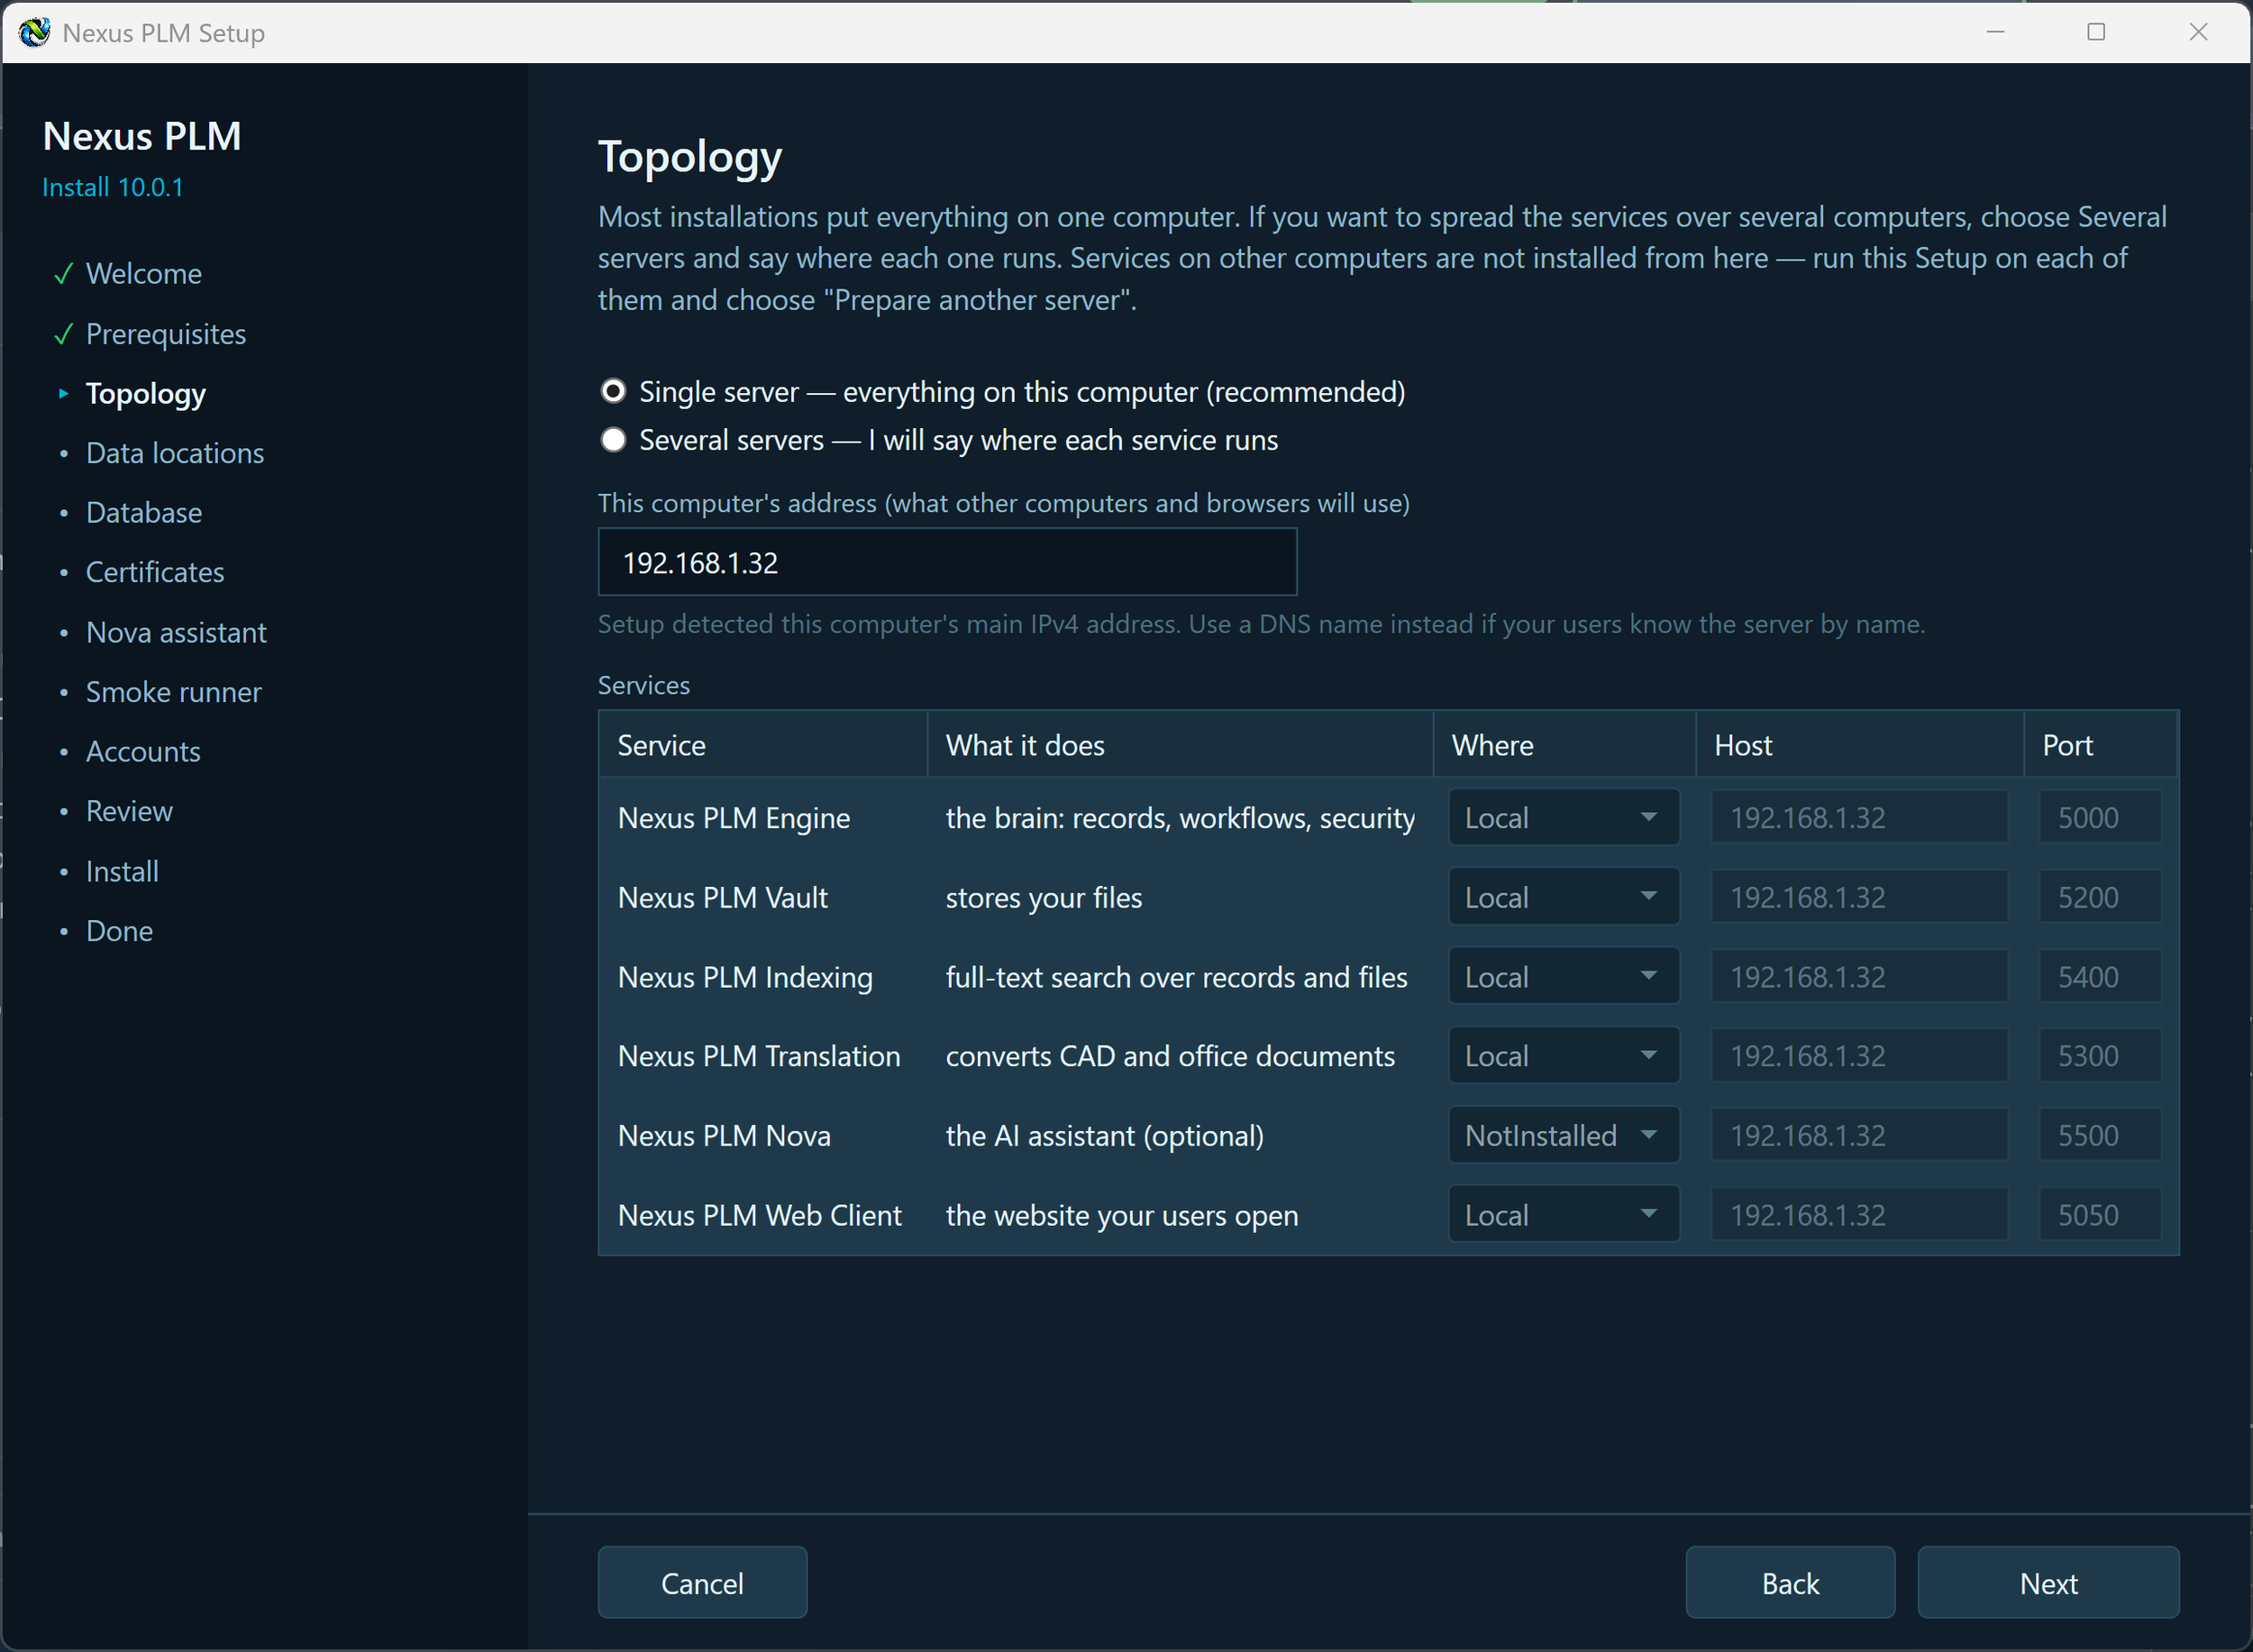
The Topology page decides which computers Nexus PLM runs on. Most installations put everything on one computer, which is the recommended choice and the one to take if you are not sure.
Single server - everything on this computer. Every service is installed here, at its standard port, and the grid is fixed: there is nothing to decide except Nova. Nova is left out by default because it needs two extra programs, Ollama and ChromaDB, that you install separately; set it to This computer if you already have them, or leave it as Not installed and turn it on later from the Manager.
Several servers - I will say where each service runs. The grid becomes editable and each service can be put on this computer, on another computer, or left out. Setup only installs the services marked This computer: for the ones on other computers you run this same Setup there and choose Prepare another server, using the shared secret from the Done page so the services trust each other.
This computer’s address is what browsers and the other computers will use to reach this one. Setup fills in the main IPv4 address it detects. Replace it with a DNS name if your users know the server by name - whatever you put here goes into the certificate and into every service address, so use the name people will actually type.
The services, in plain words: Engine is the brain (records, workflows, security); Vault stores your files; Indexing provides full-text search over records and files; Translation converts CAD and office documents; Nova is the optional AI assistant; Web Client is the website your users open. Engine and Web Client are always installed.
A few rules Setup enforces: every service needs a free, unique port on its computer; Indexing needs the Vault, and reads vault files directly from disk, so put it on the same computer as the Vault or give it the vault share as a UNC path; Nova needs Indexing. Anything that does not add up is listed in red under the grid, with what to change.
When the grid is right, press Next.
4 - Data Locations
It All Begins Here
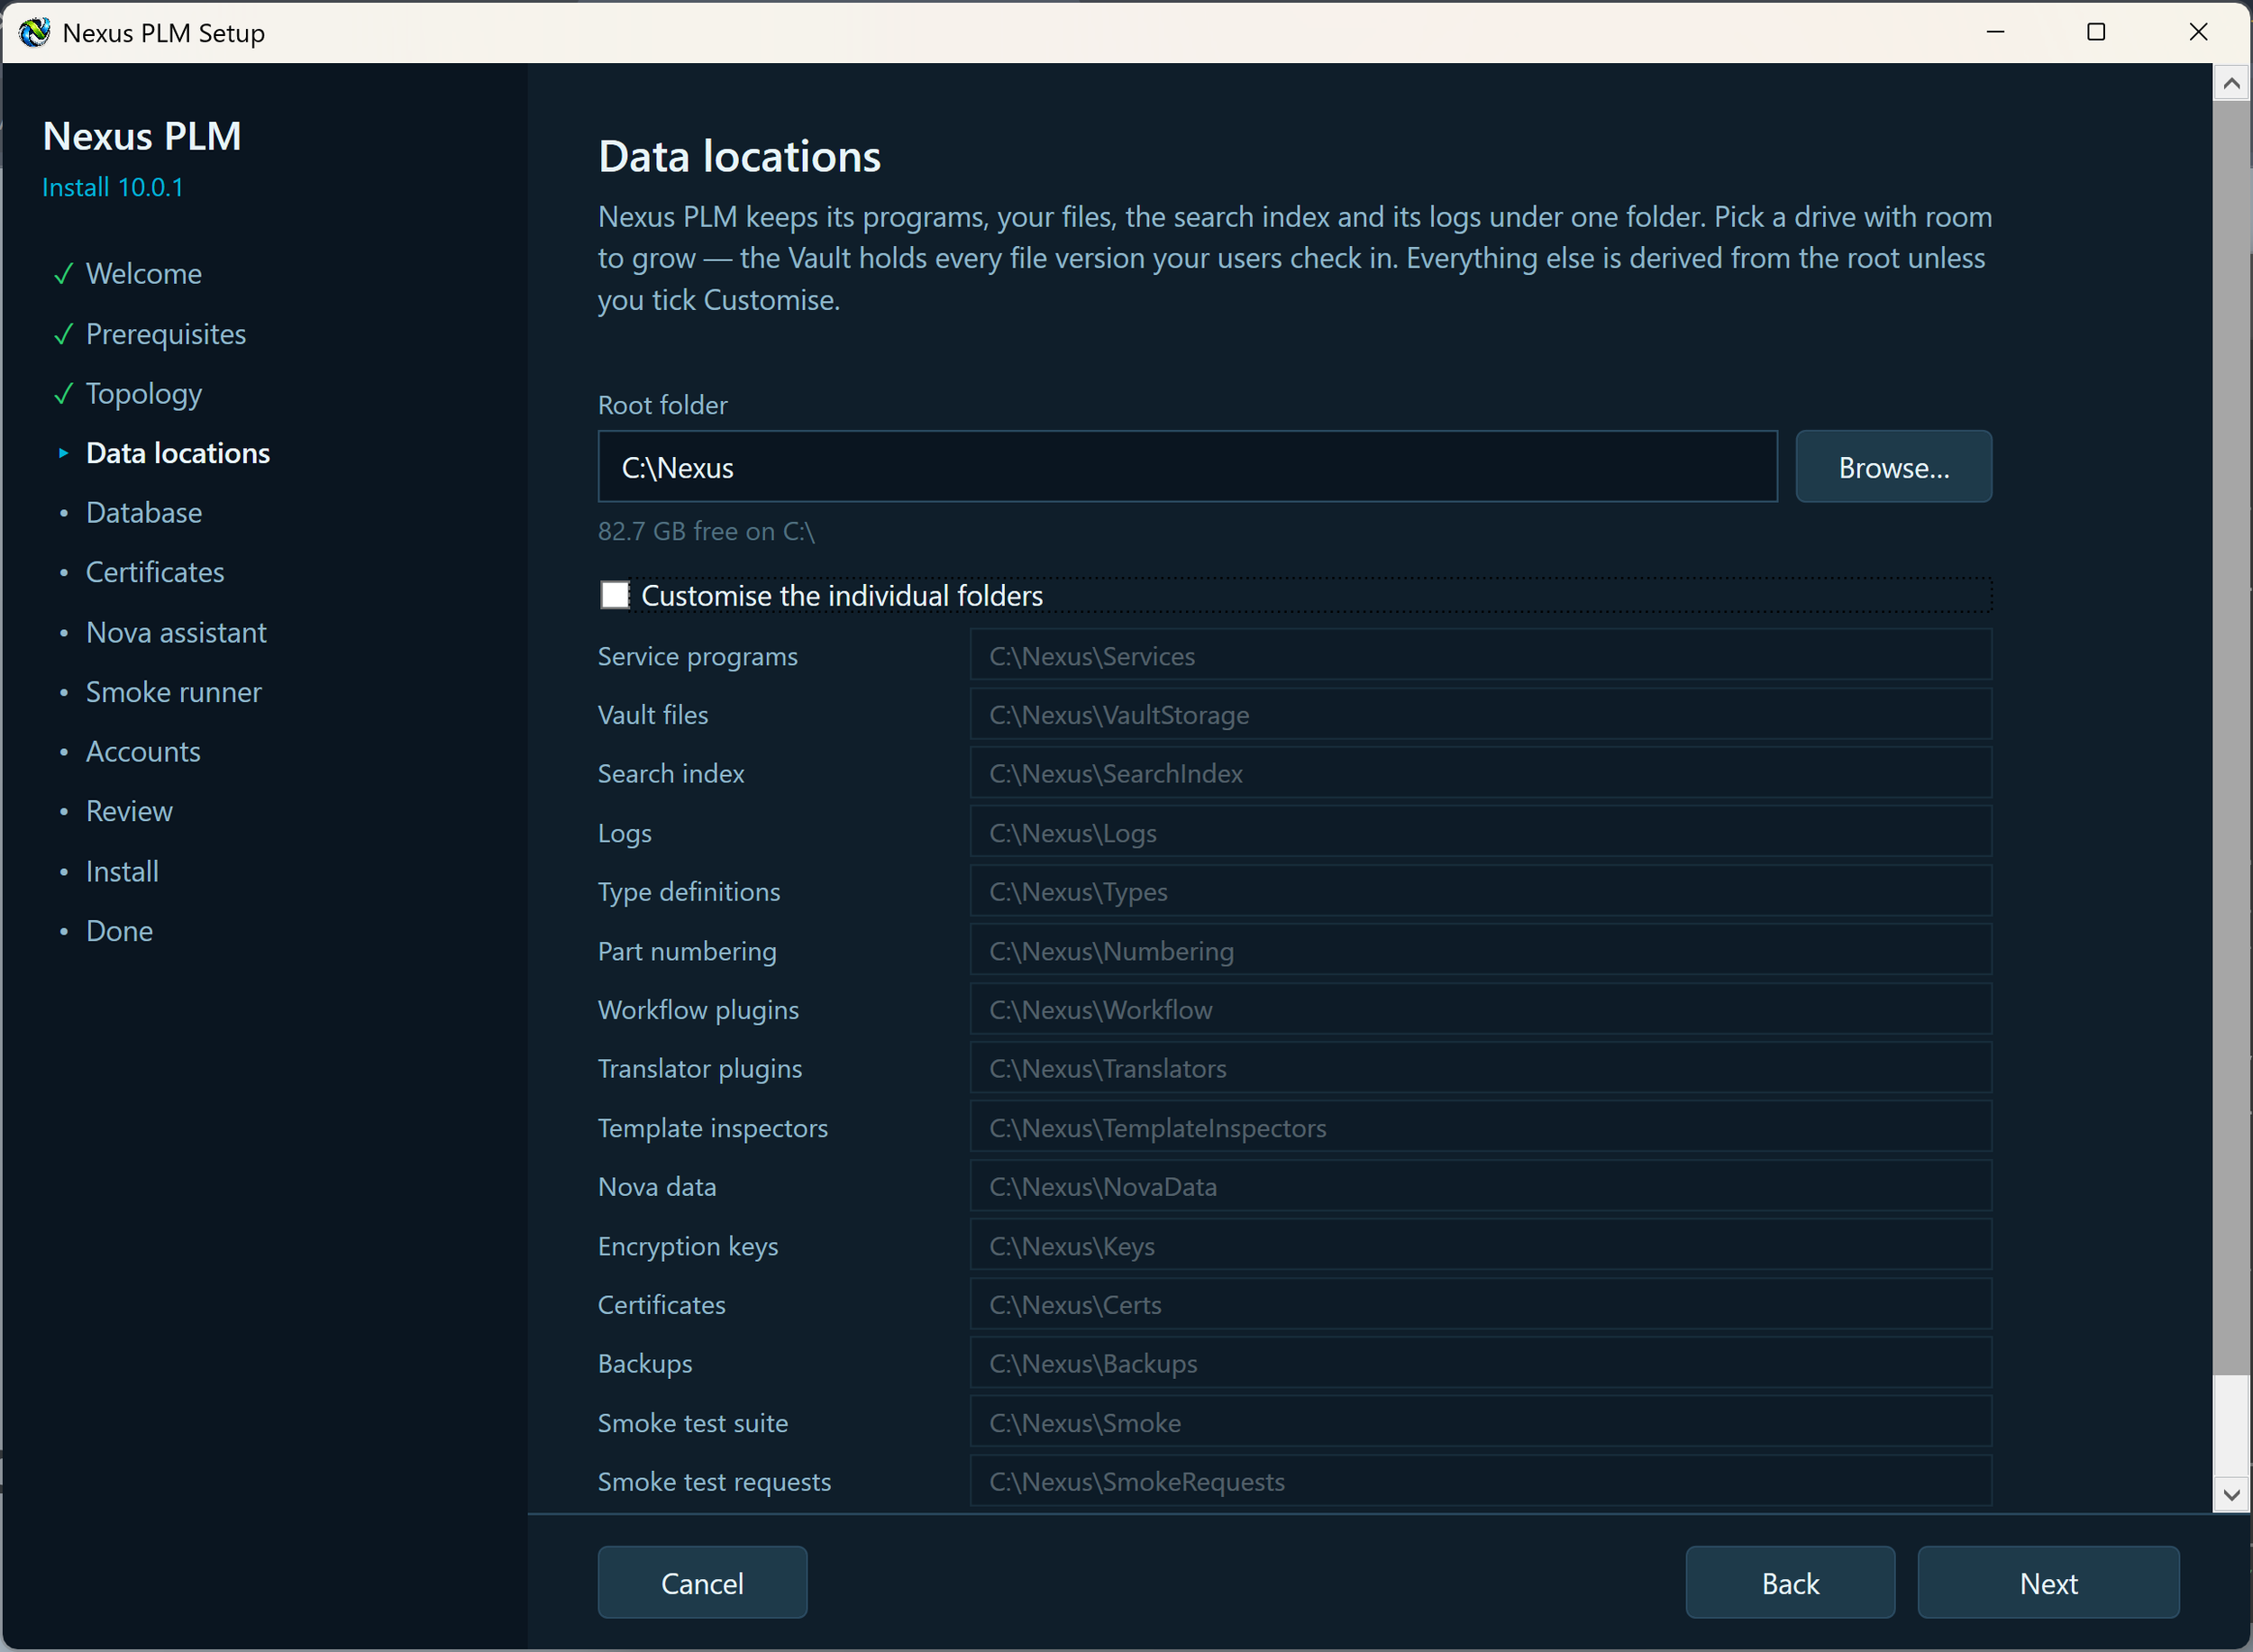
Everything this installation writes lives under one root folder, C:\Nexus by default: the programs, your files, the search index, the logs and the certificate. The page shows that root and every folder derived from it, so you can see where things will end up before anything is created.
In almost every case you change only the root folder. Pick a drive with room to grow - the Vault keeps every version of every file your users check in, and the search index grows with it - and everything else follows automatically. If the folder does not exist yet, Setup creates it.
The derived folders are shown read-only. Press Customize only if a particular folder has to live somewhere else, for example the vault storage on a larger drive or on a share that another computer can reach.
Do not put the root inside C:\Program Files: Windows protects that folder and the services would not be able to write there. Avoid removable drives and, for anything other than vault storage, network drives - if the drive disappears, so does the whole system.
Check the root, then press Next.
If Setup objects: the root is under Program Files, choose something like C:\Nexus or D:\Nexus instead; the folder is not writable, pick another one or give Administrators and SYSTEM full control of it in Properties, Security; not enough free space, choose a drive with at least 10 GB free and room to grow.
5 - Database
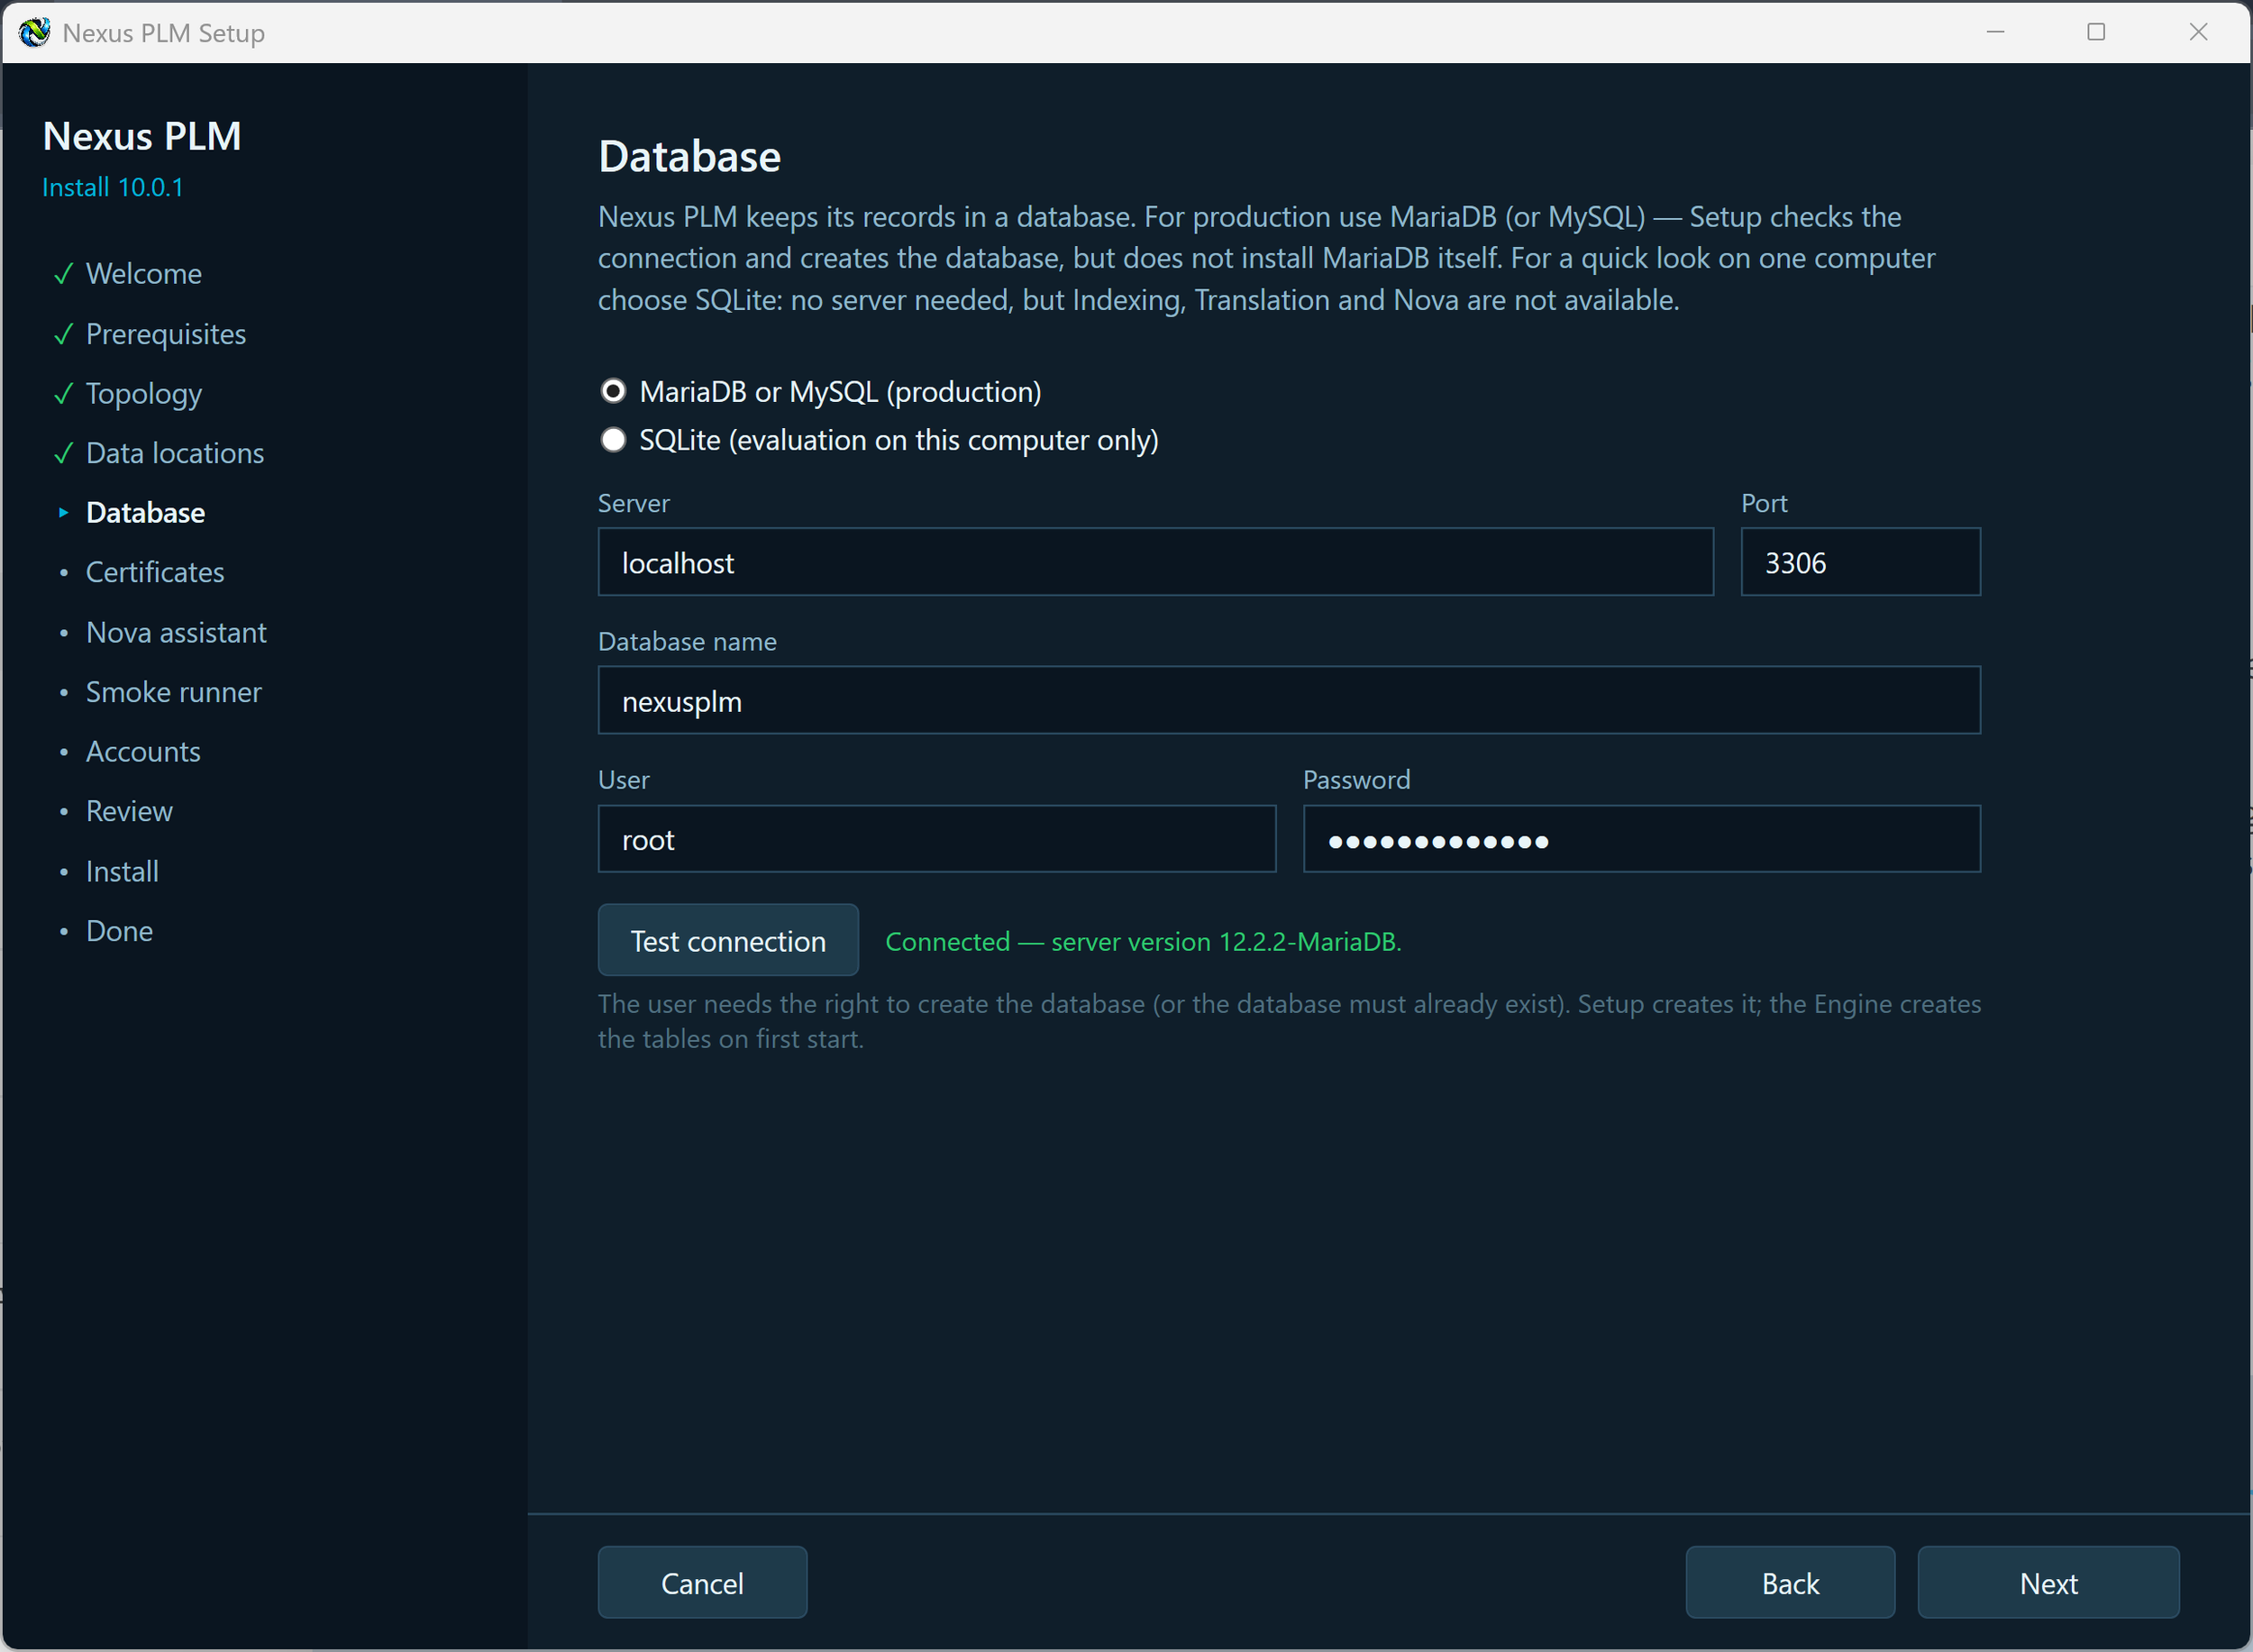
Nexus PLM keeps its records - parts, documents, changes, projects, users, workflows - in a database. This page is where you say which one, and Setup proves it can reach it before you go any further.
MariaDB or MySQL is the choice for real use. Setup does not install MariaDB: install it first (the default settings are fine) and give Setup a user that may create the database, or create an empty database yourself and give Setup a user with full rights on it. Fill in the server address, the port (3306 unless you changed it), the database name, the user and the password.
SQLite is for evaluation on one computer only. It is a single file under your data root, needs no server and nothing to configure - but Indexing, Translation and Nova are not available with it, so full-text search, document conversion and the AI assistant are left out. Use it to try Nexus PLM out, not to run it.
Press Test connection. Setup connects with exactly what you typed and reports the server version, or says what went wrong. The verdict belongs to those details only: change any of them and the result clears, so you always know the green tick matches what is in the boxes. Pressing Next tests again if you have not.
Host note for a multi-server installation: localhost only means “this computer”, so if a service runs elsewhere, give the database server’s real address here, as the other machines see it.
When the test is green, press Next.
If the test fails: access denied means the user name or password is wrong, or the user has no rights on that database; nothing answered at that address usually means MariaDB is not running, is listening only on its own computer, or the port is blocked by a firewall. Fix it and press Test connection again.
6 - Certificates
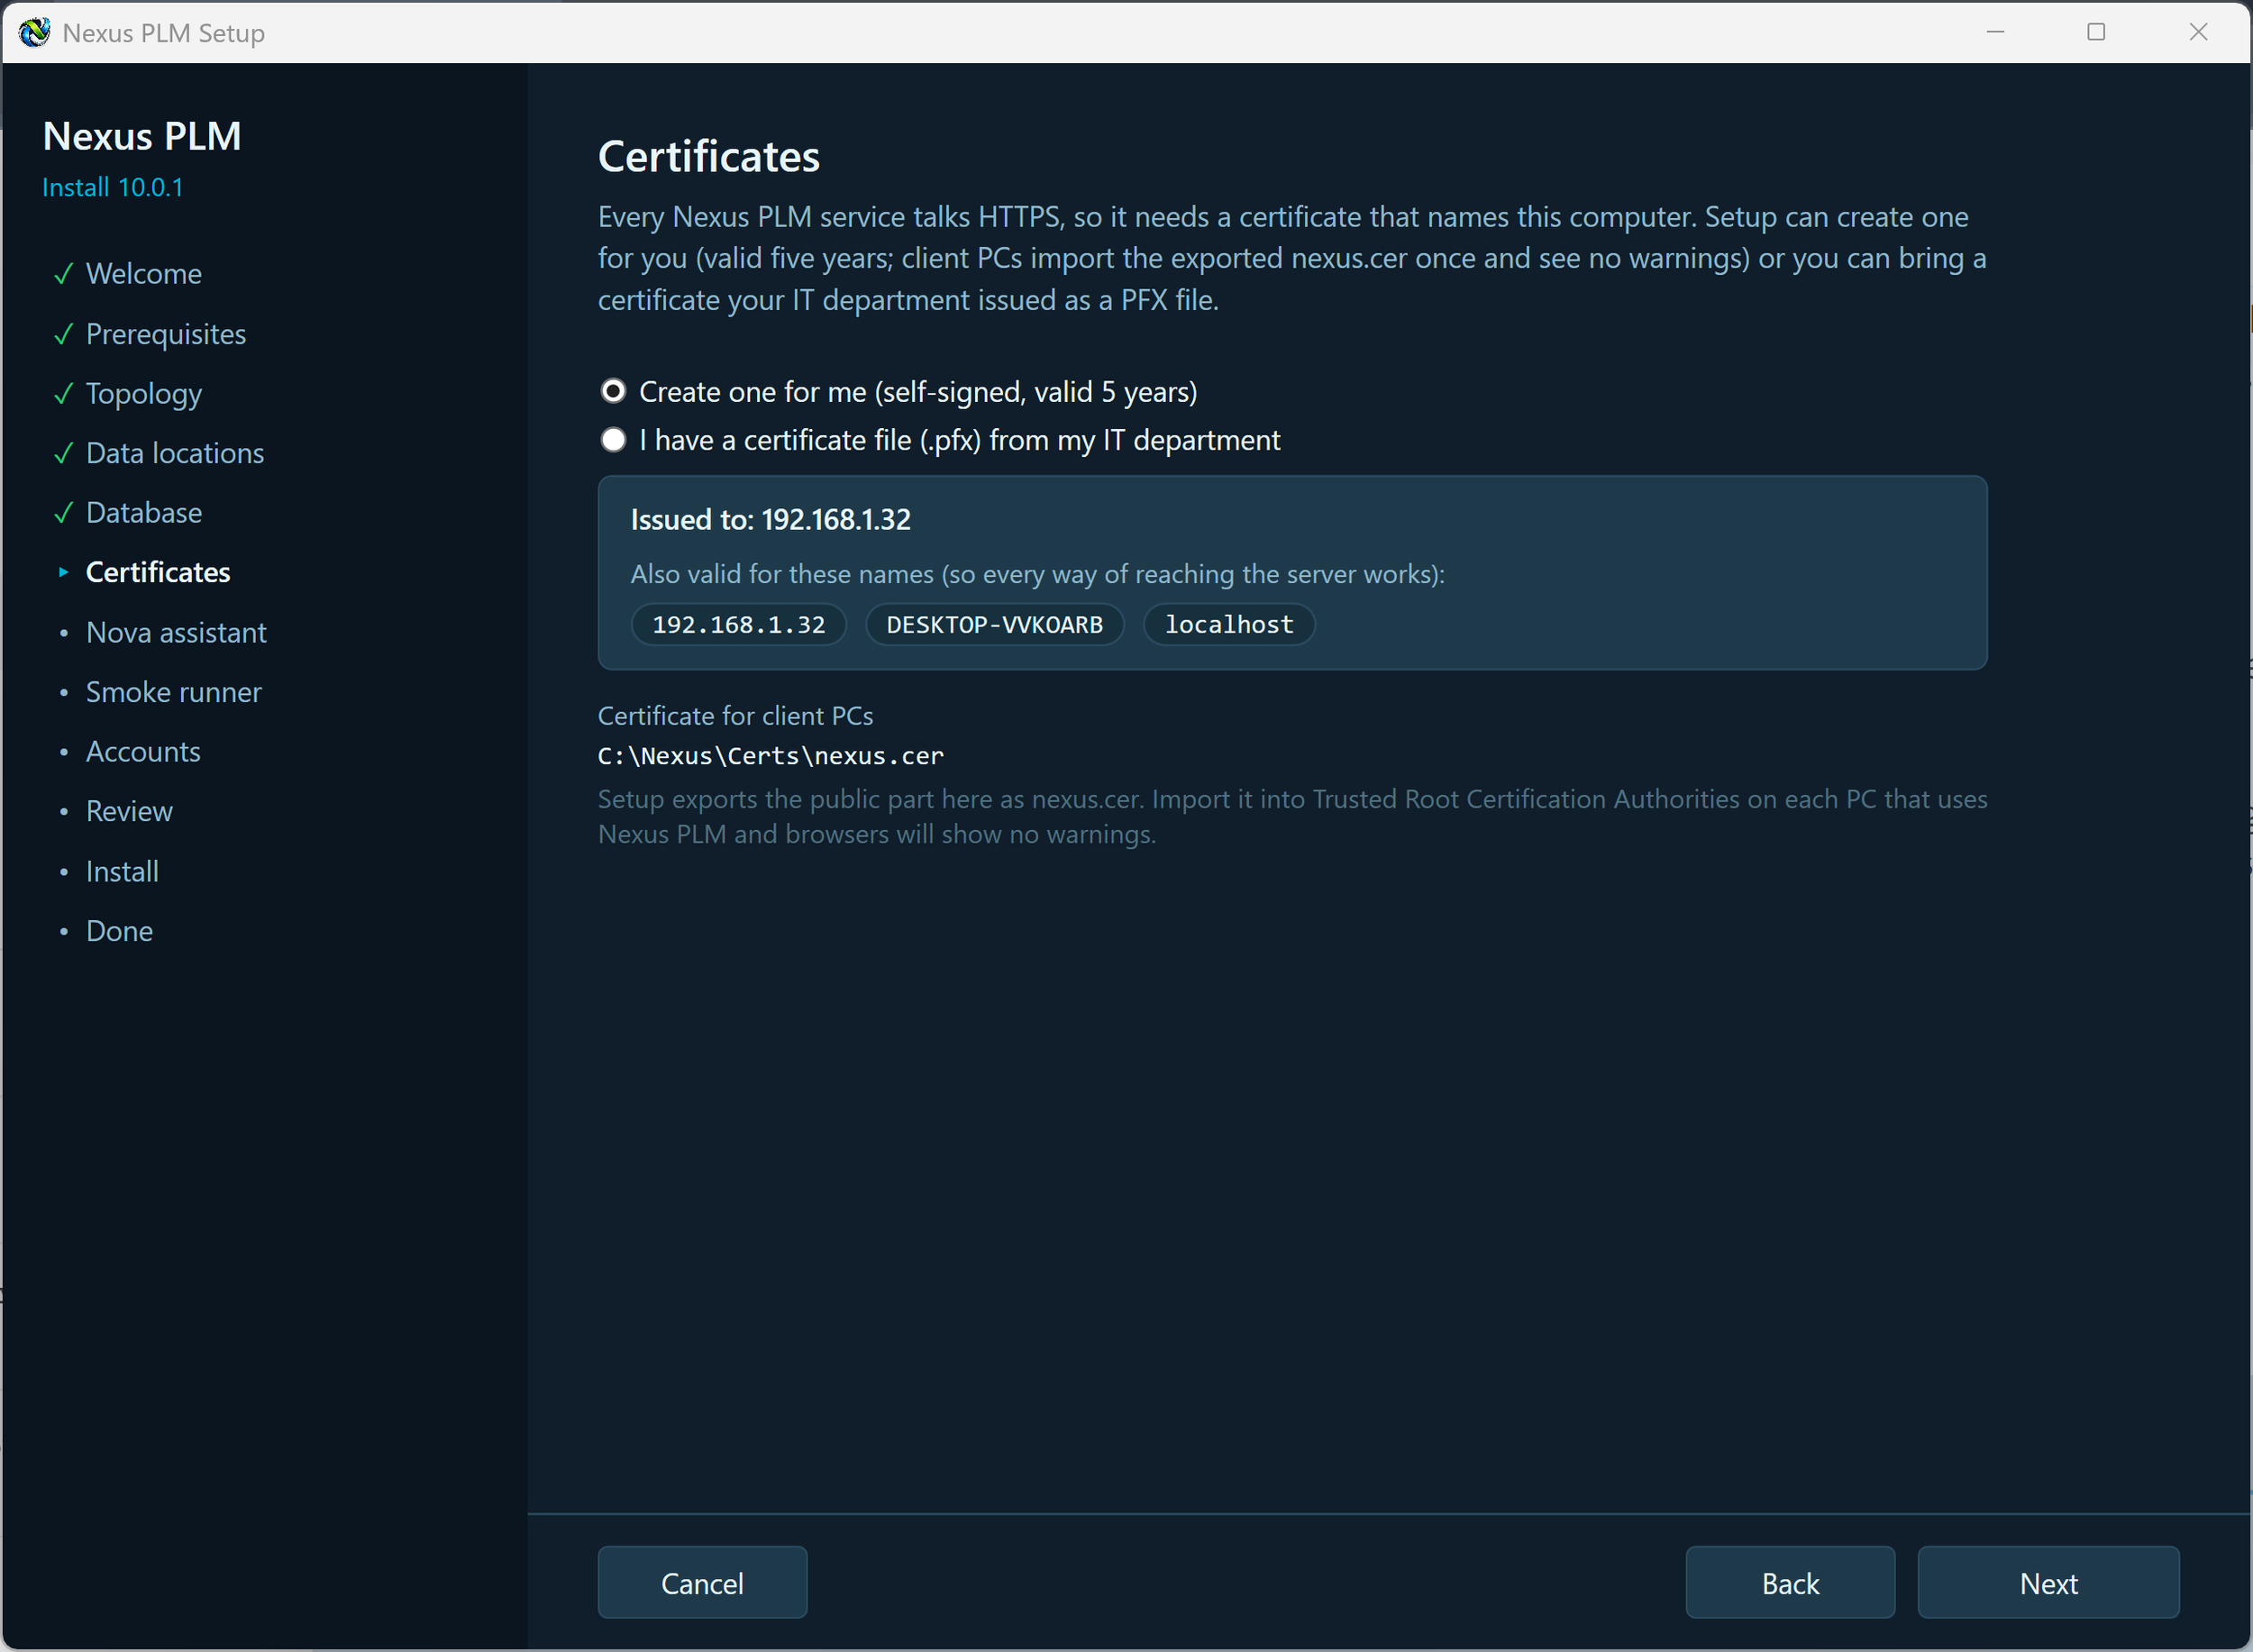
Every Nexus PLM service talks HTTPS, so the server needs a certificate that names this computer. This page decides where that certificate comes from.
Create one for me is the simple choice and needs nothing else from you. Setup issues a certificate valid for five years, covering the address you gave on the Topology page, the computer’s name, its full DNS name, every IP address it has, and localhost, and installs it in the Windows certificate store. Because it is self-signed, each client PC has to trust it once - Setup exports the public half as nexus.cer for exactly that, and the page tells you where it will be written.
I have a certificate file from my IT department is for organisations that issue their own. Browse to the .pfx file and enter its password. Setup checks that it really contains a private key, that it is meant for server authentication, and warns you if it does not cover the address your users will type.
You never need to invent or remember a certificate password: Setup generates a strong random one for the file it writes and keeps it inside the protected configuration. The plain-text cert.key file that older installers left behind is gone.
Make your choice and press Next.
Keep a note of the nexus.cer path - you will copy that file to the client PCs later, and importing it is what stops browsers warning about the site.
If Setup objects: a rejected password is case-sensitive, so try again; no private key in the file means it must be exported again with “include the private key” ticked; not valid for server authentication means asking for a certificate with that purpose, or letting Setup create one. Two warnings do not block you - a certificate that does not cover the address users type (browsers will complain unless you fix it) and one that expires within 60 days (renew it soon; the Manager can renew or replace it).
Installation Certificates
7 - Nova Assistant
Nova is the AI assistant built into Nexus PLM: it answers questions about your parts, documents and changes in plain language. It is optional, and this page only appears if you chose to install it on the Topology page - if you did not, Setup skips straight past it.
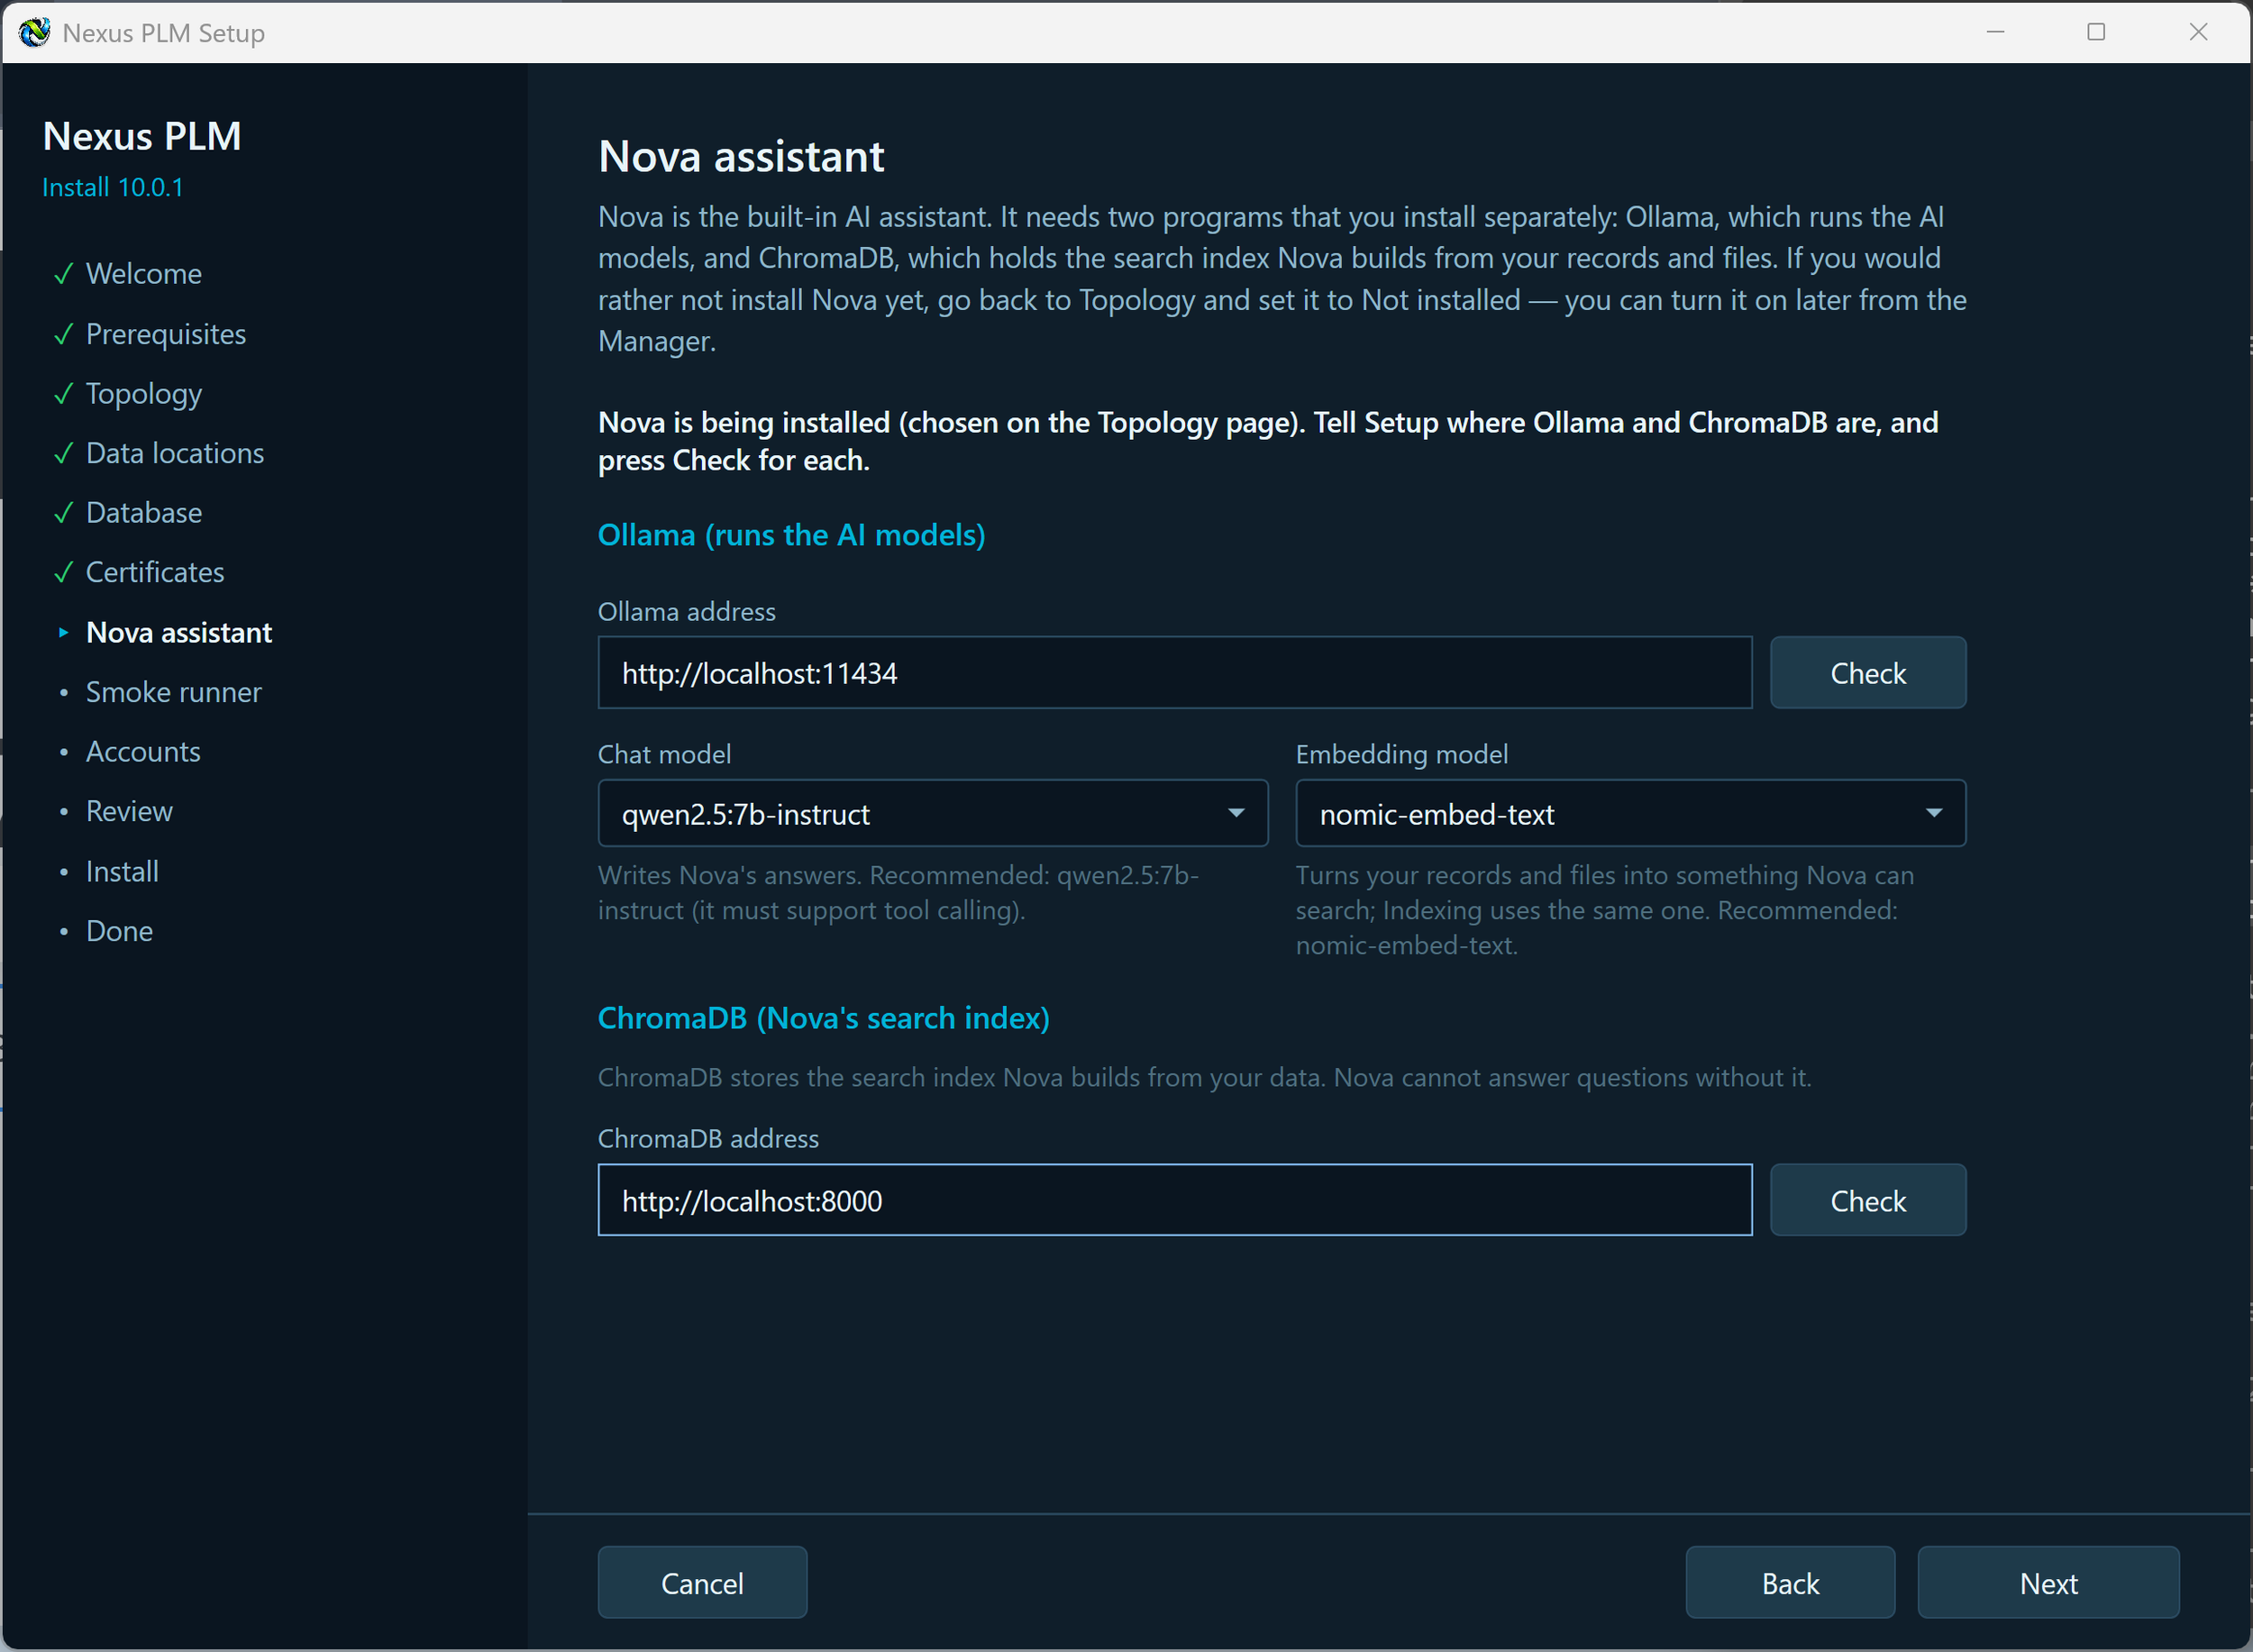
Nova needs two programs that are not part of Nexus PLM and that you install separately: Ollama, which runs the AI models, and ChromaDB, which holds the search index Nova builds from your records and files. Both can run on this computer or on another one you can reach. Setup checks that they answer, but never installs them.
Ollama address is where Ollama listens, port 11434 on this computer by default. Press Check: Setup asks Ollama which models it has and tells you whether the two Nova needs are among them.
Nova uses two different kinds of model and needs one of each. The chat model writes the answers and must support tool calling - qwen2.5:7b-instruct is the tested recommendation. The embedding model turns your records and files into something Nova can search, and Indexing uses the same one - nomic-embed-text is the recommendation. Both boxes are filled in for you; leave them alone unless you know you want something different. If Check says a model is missing, run the ollama pull command it names on the computer running Ollama, then press Check again.
ChromaDB address is where ChromaDB listens, port 8000 by default. Press Check. Without it Nova has nowhere to keep what it has read, and cannot answer questions.
When both checks are green, press Next.
If a check fails and the program is on another computer, the usual cause is that it only listens to itself. Ollama listens on its own machine only, unless the machine environment variable OLLAMA_HOST is set to 0.0.0.0 with the port and Ollama is then restarted; ChromaDB must be started with its host option set to 0.0.0.0. In both cases the port must also be open in that computer’s firewall. Setup tells you which of these applies in the message under the address.
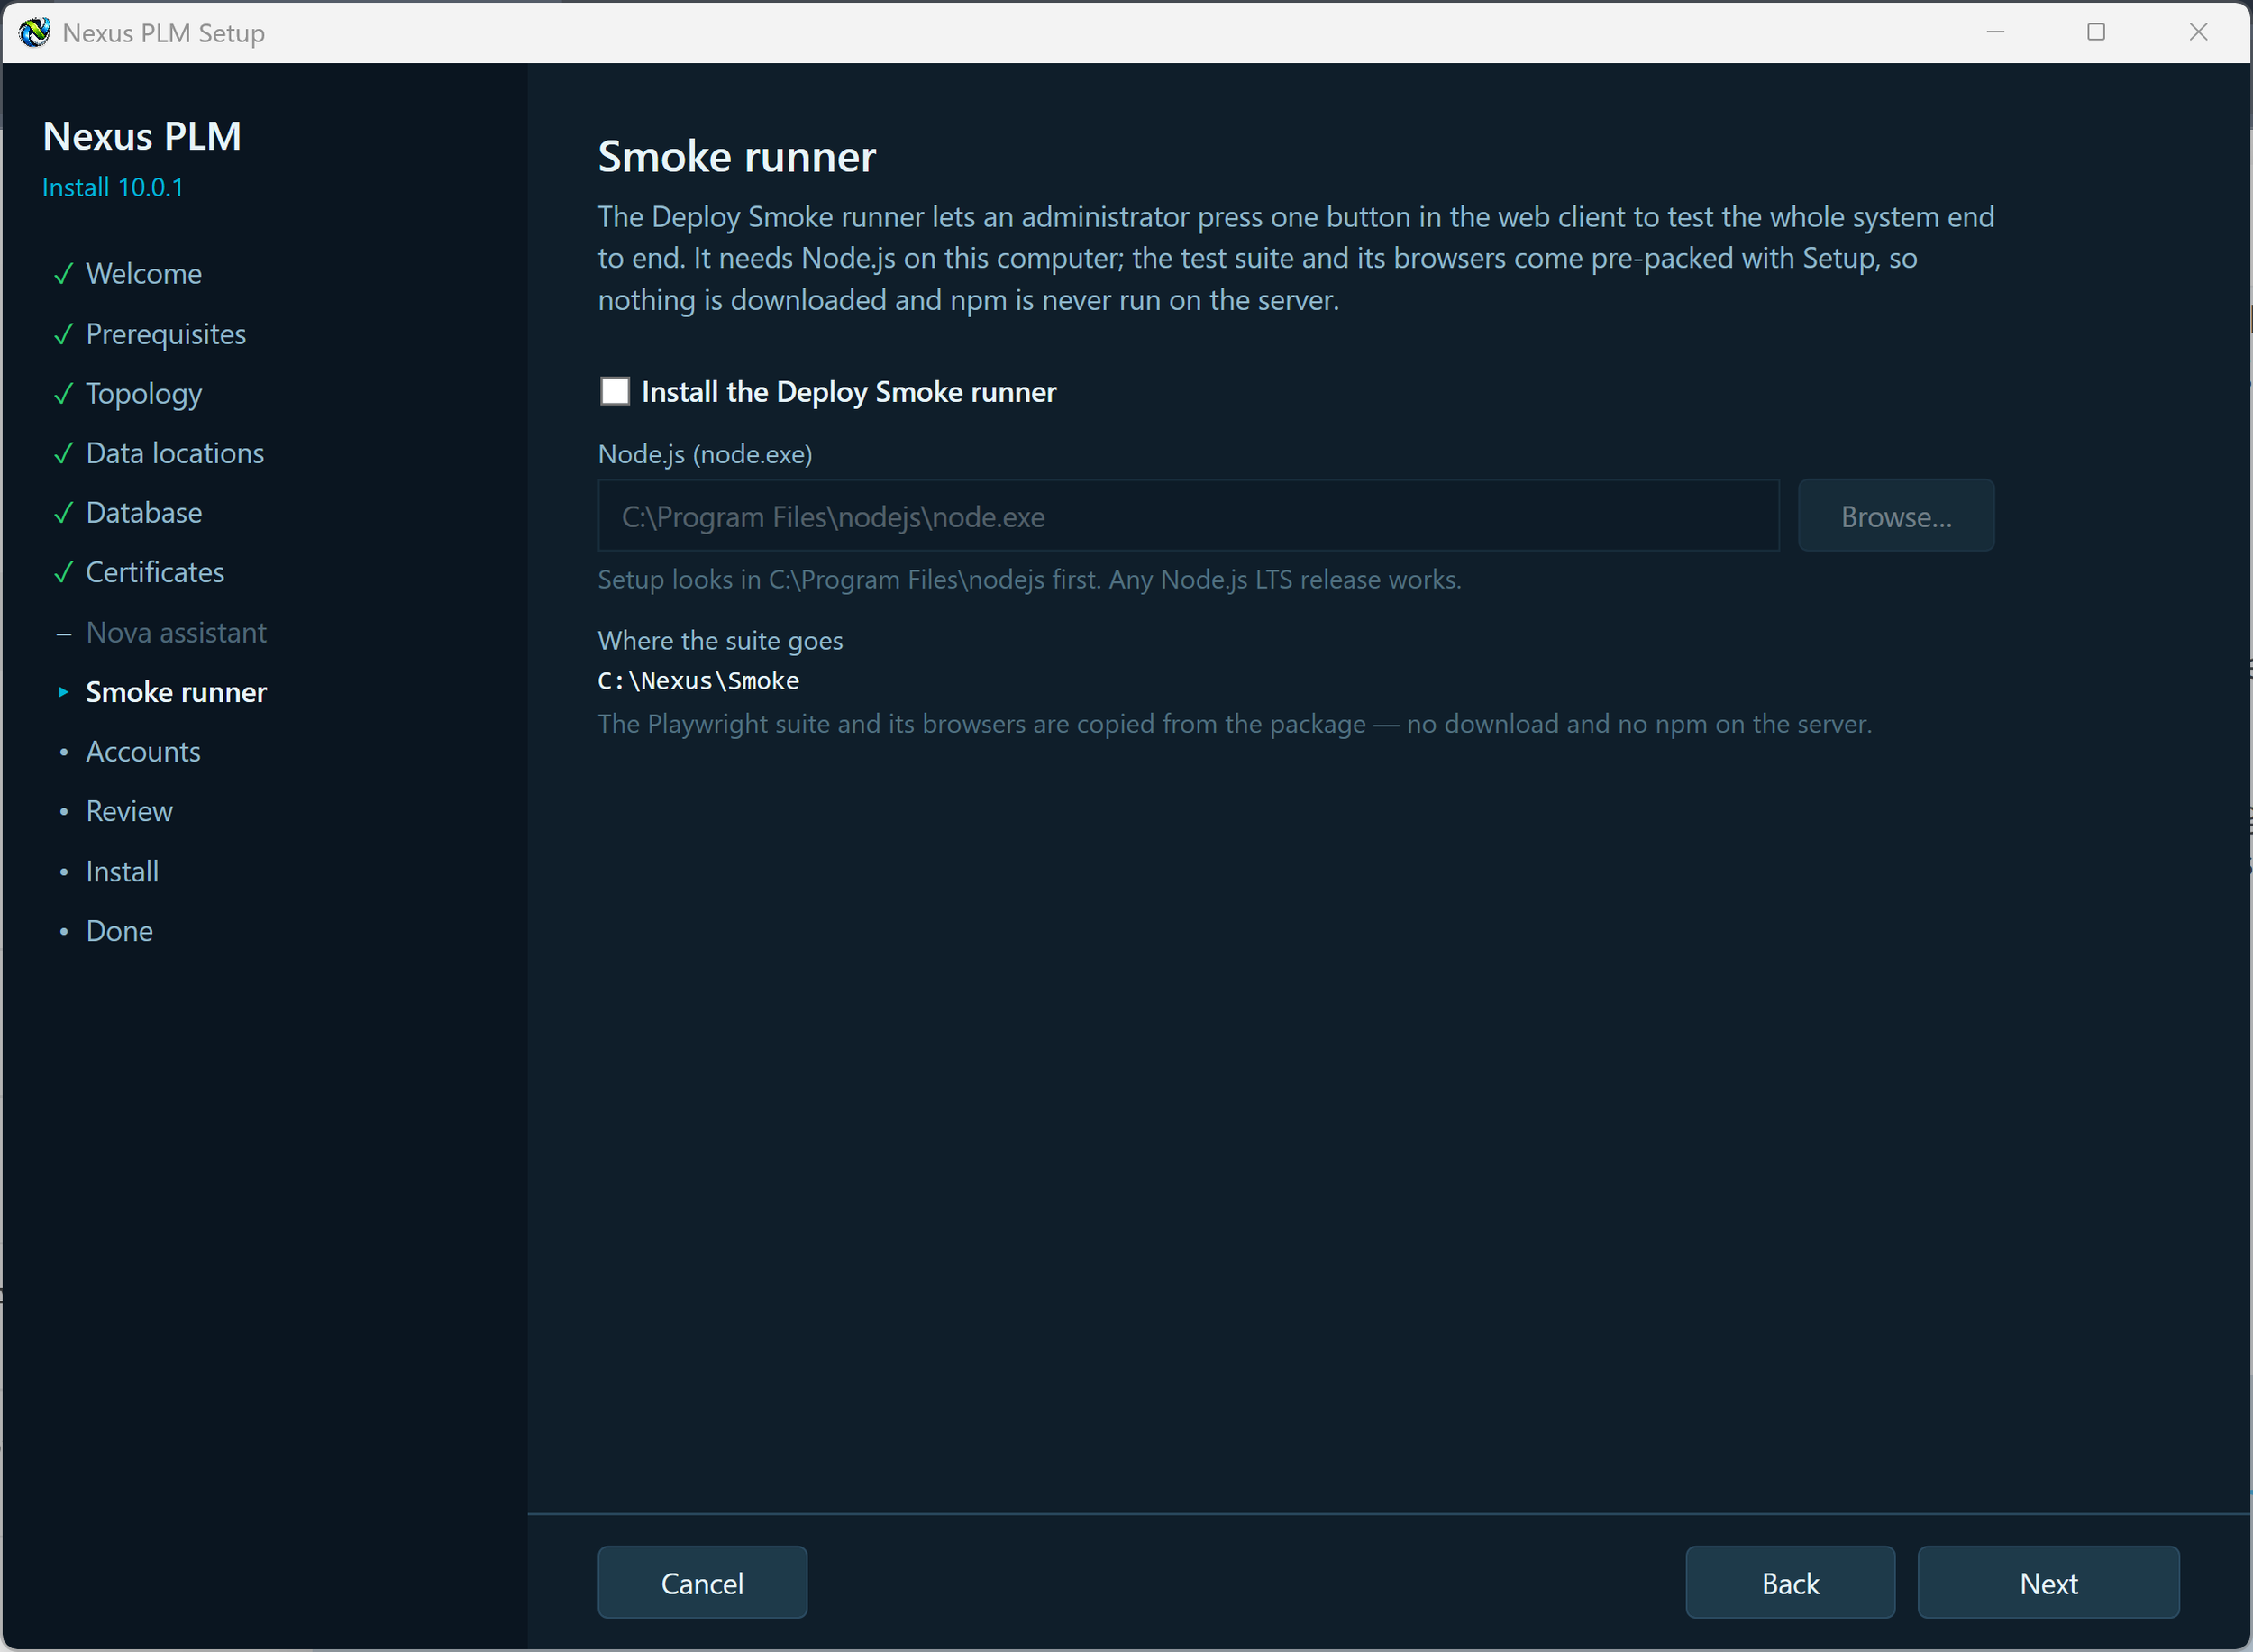
8 - Smoke Runner
The Deploy Smoke runner is a self-test for the whole system. An administrator presses one button in the web client and the Engine opens the website in a real browser, signs in, creates a few records, checks that they behave, and tidies them up again - then shows what passed and what failed on the dashboard. It is the quickest way to know an installation or an upgrade actually works, rather than merely started.
It is optional and switched off by default. Tick Install the Deploy Smoke runner to include it; leave it clear if you would rather not, and you can turn it on later from the Manager.
The test suite and the browser it drives are packed inside this installer and copied to the Smoke folder under your data root. Nothing is downloaded and npm is never run on the server. The one thing the server needs of its own is Node.js: Setup looks for node.exe and fills in the path, and you can browse to it if it lives somewhere unusual.
The runner needs the Engine and the Web Client on this computer, because the Engine starts the test and reads the results from the website’s own folder. In a multi-server installation, install it on the computer that runs those two.
Make your choice and press Next.
If Setup objects: Node.js was not found, install the current LTS release from nodejs.org and press Re-check, or browse to node.exe yourself; the Engine or Web Client is somewhere else, either move them here or leave the runner off; this package was built without the smoke suite, use the full installer or leave the runner off.
9 - Accounts
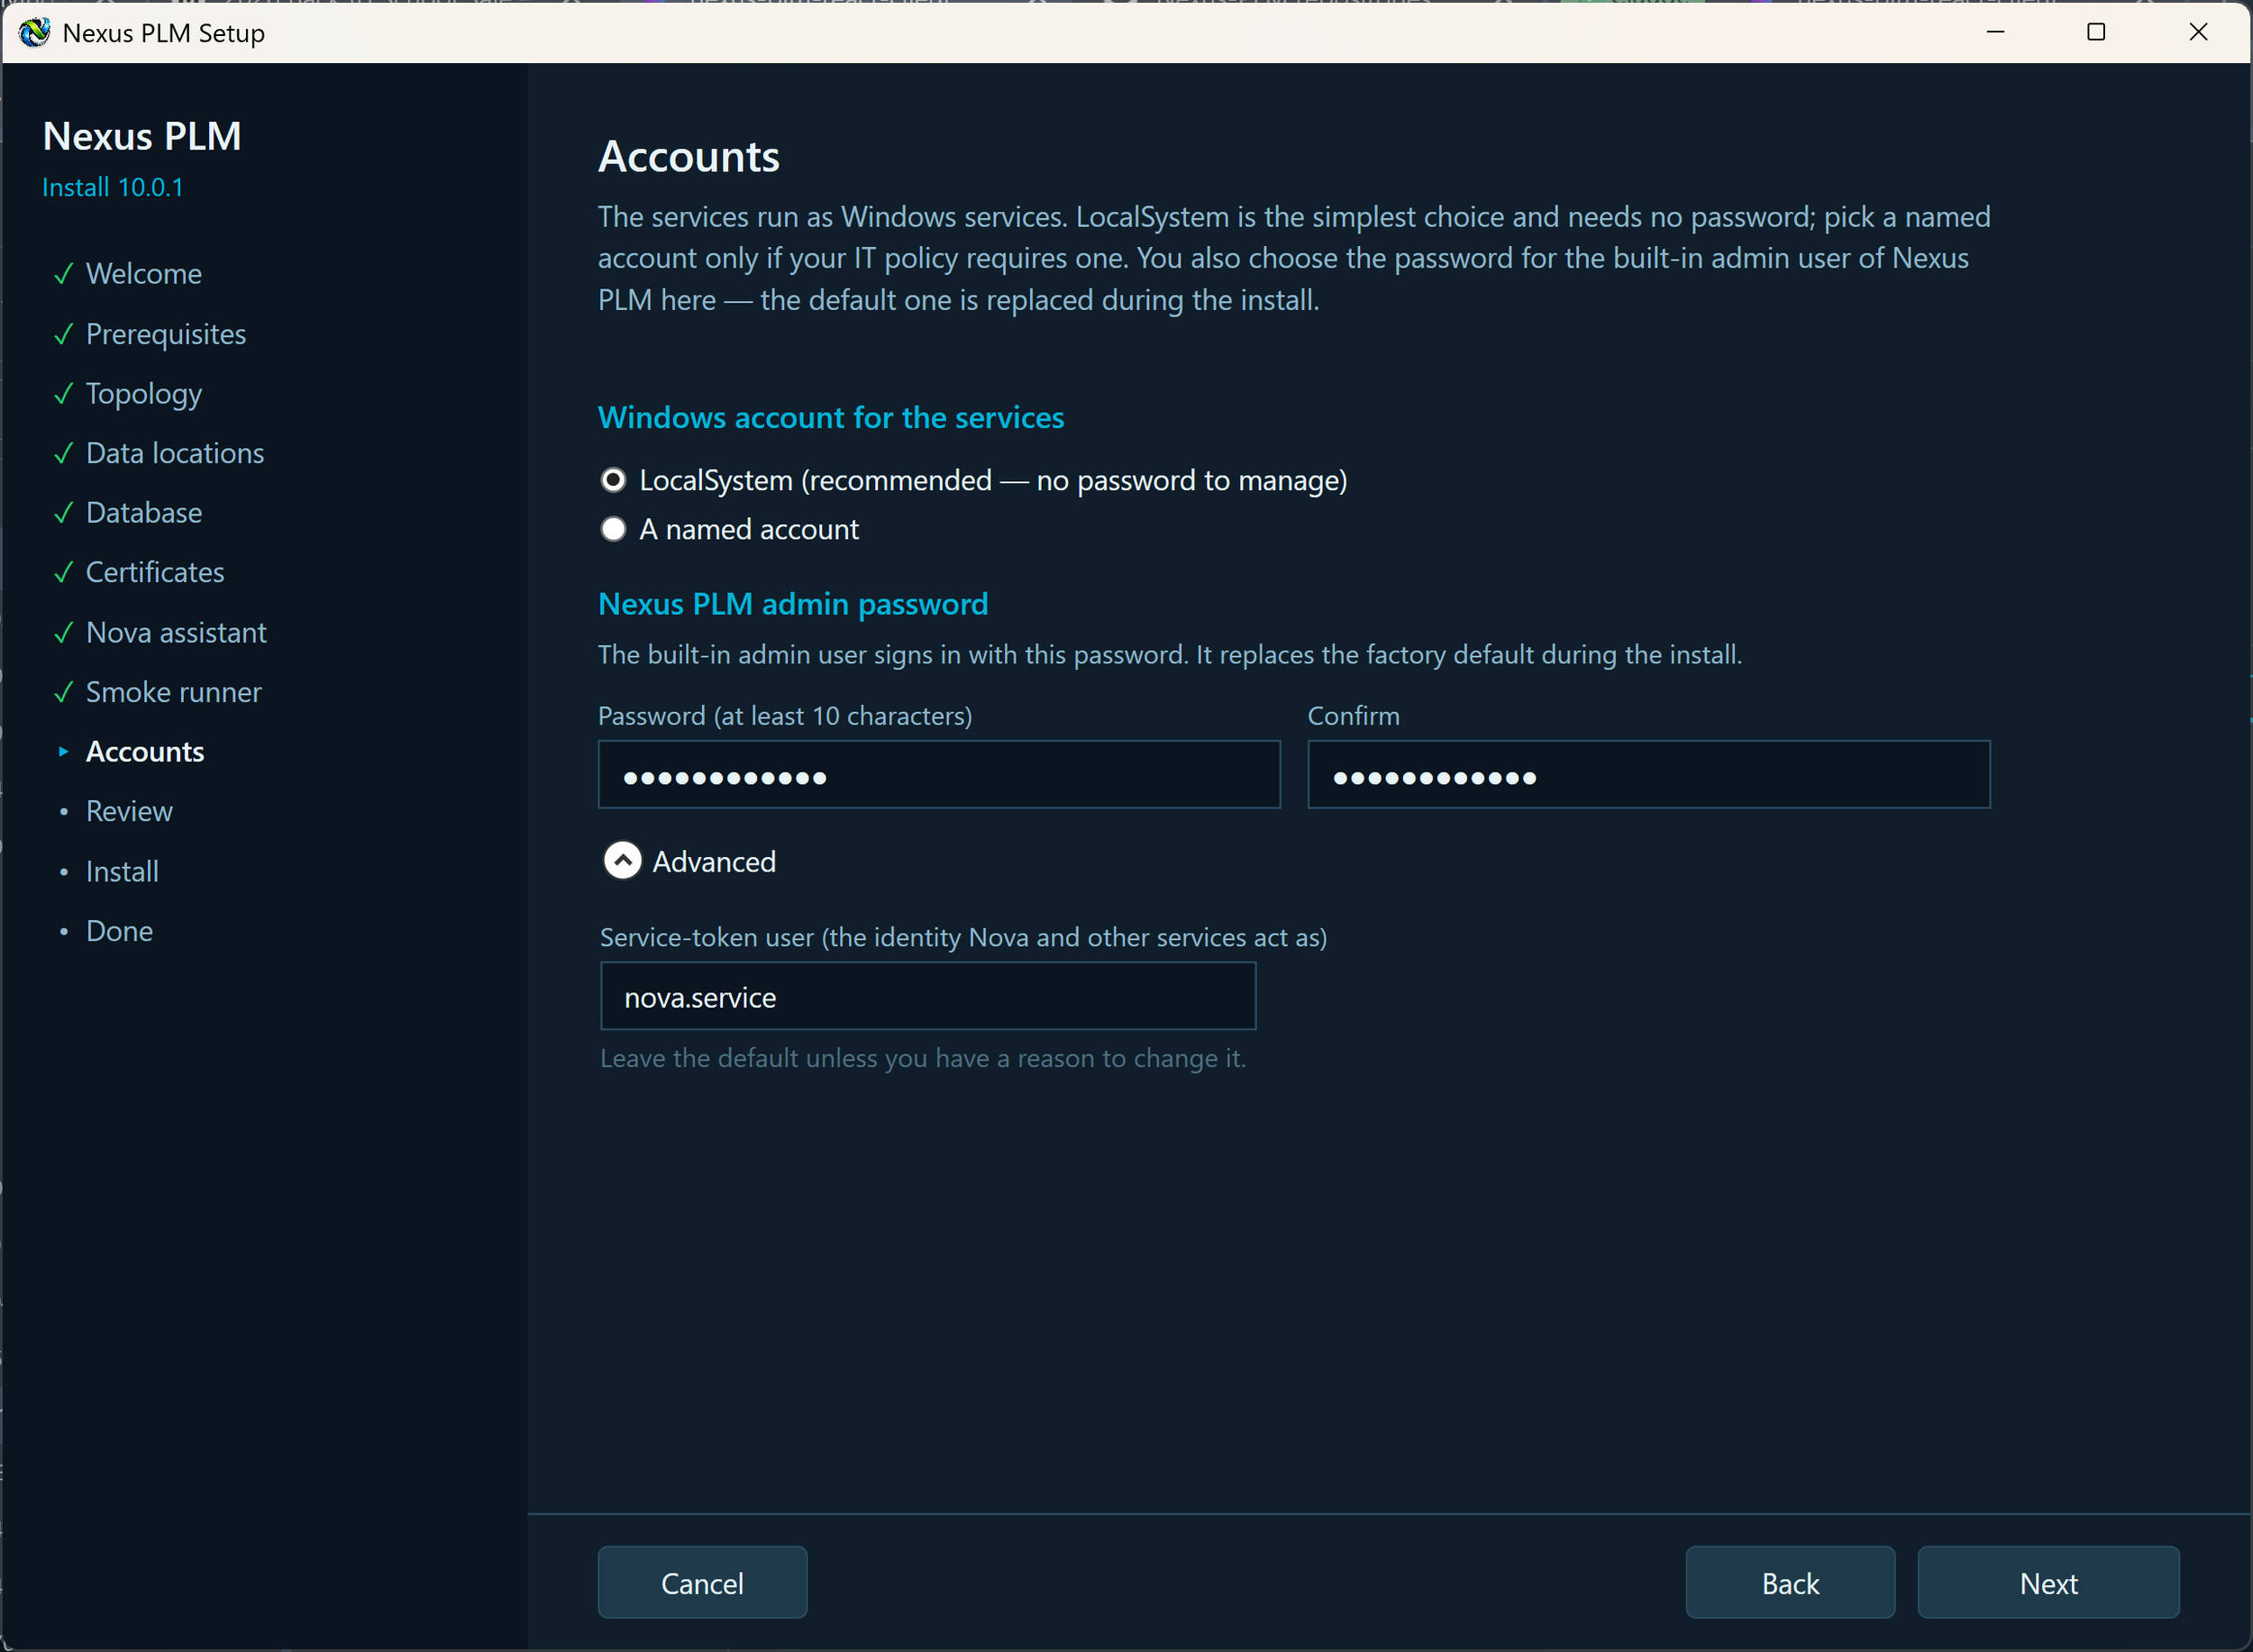
This page asks two things: which Windows account the services run under, and the password for the first Nexus PLM administrator.
Windows account for the services. LocalSystem is the right answer in almost every case: it needs no password, it survives password policies, and Setup arranges every folder permission for it. Choose a named account only if your IT policy insists on one. Enter it as DOMAIN\user or .\user with its password; Setup checks that the sign-in works and grants the account the “Log on as a service” right.
The service account password is used once, to register the services, and is never stored. If that account’s password is changed in Windows later, update it in the Manager under Settings, Accounts, or the services will stop starting.
Administrator password. Nexus PLM ships with a built-in admin user whose password is well known. Setup replaces it with the one you type here as soon as the Engine starts, so the system is never reachable with a default password. Use at least 10 characters - a short sentence works well - type it twice, and write it down somewhere safe: this is how you sign in the first time, as the user admin.
Under Advanced there is the Nova service user, the Nexus PLM account Nova acts as when it looks things up. Leave it as it is unless you have a reason to change it.
Fill both in and press Next.
If Setup objects: the two passwords do not match, or the password is shorter than 10 characters, type them again; it could not sign in with the named account, check the user name form and the password and that the account exists here or in the domain; it could not grant “Log on as a service”, a domain policy is overriding that right, so ask your domain administrator to add the account to it, or simply use LocalSystem.
10 - Review
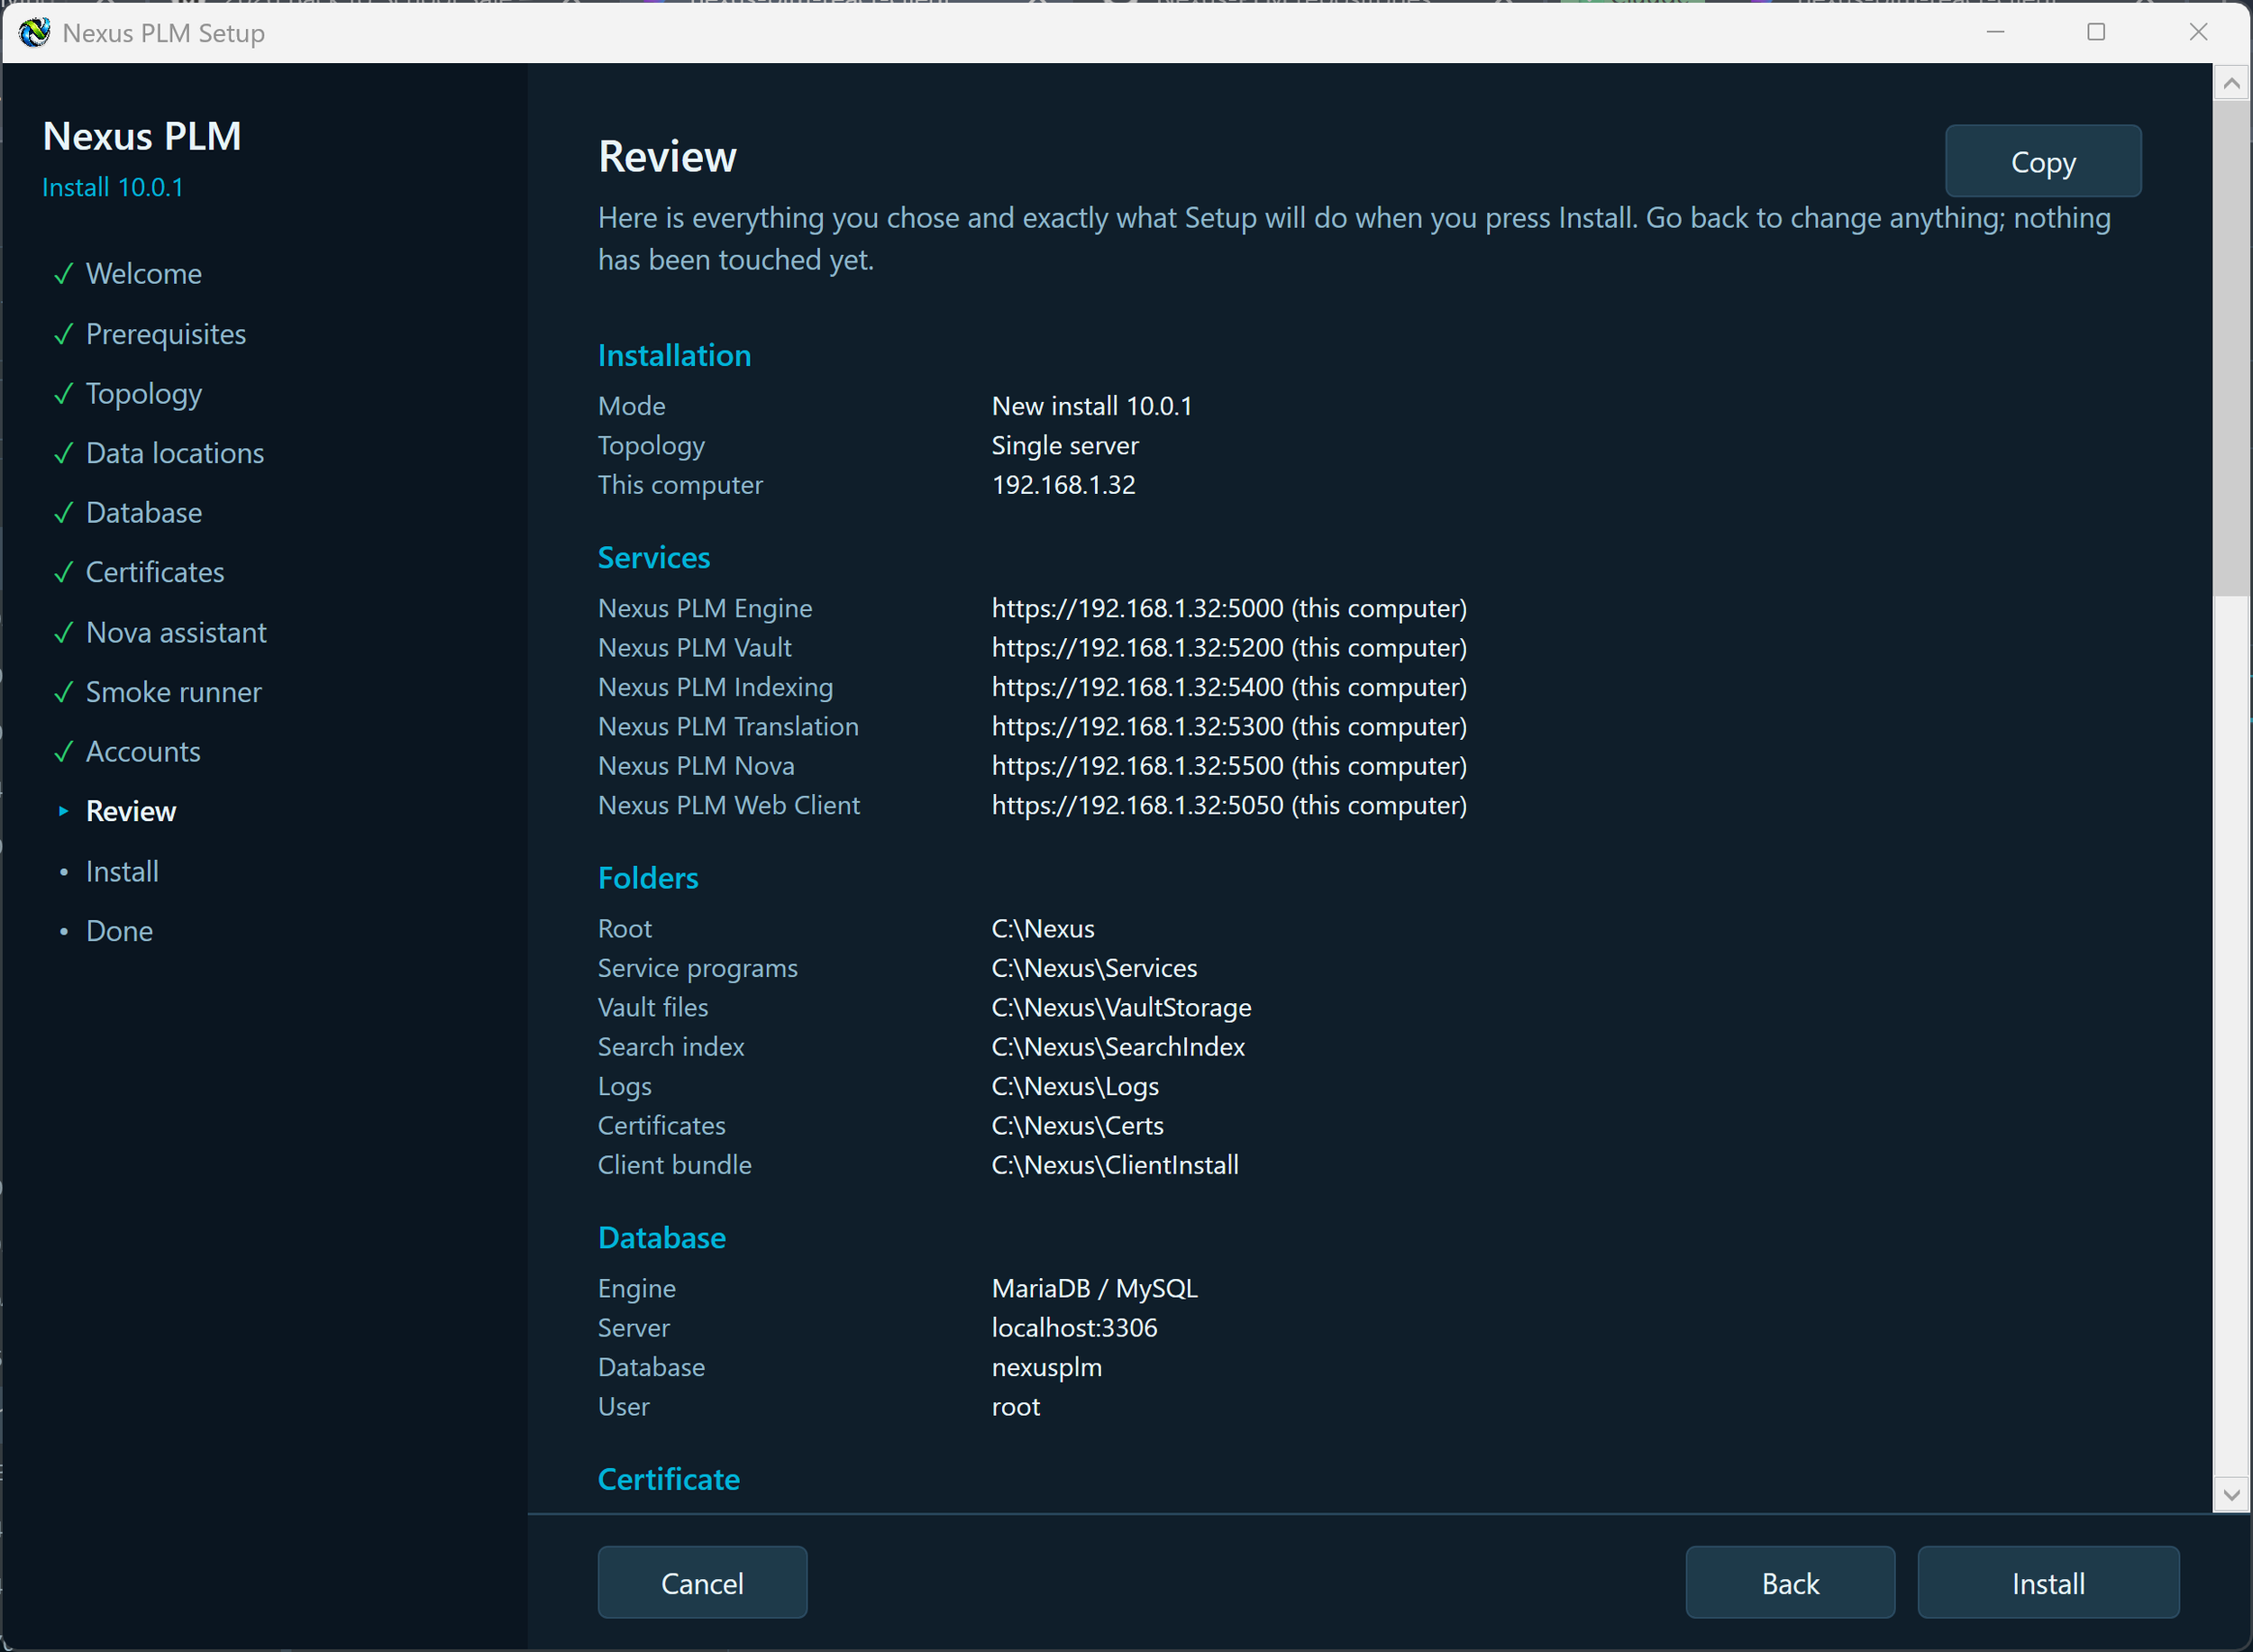
The Review page is the last stop before anything on this computer changes. It shows every answer you gave, grouped exactly as the pages were, and then the precise list of what Setup is about to do: each folder it will create, the certificate it will issue, the database it will prepare, every service it will register, every firewall port it will open.
Read it properly. This is the moment to catch a wrong address, a database on the wrong server or a data root on the wrong drive, and any group has a link back to the page it came from, so correcting something takes seconds. Nothing has been touched yet, and Cancel is still safe.
Press Copy if you want the summary for your records or your change request. It contains no passwords and no secrets.
When you are happy, press Install. That is the point at which Setup starts changing the computer.
If Setup says something changed since the pages were checked, a port has been taken or a folder has disappeared while you were reading. Go back to the page it names - it re-checks as you enter it - and come back.
11 - Install
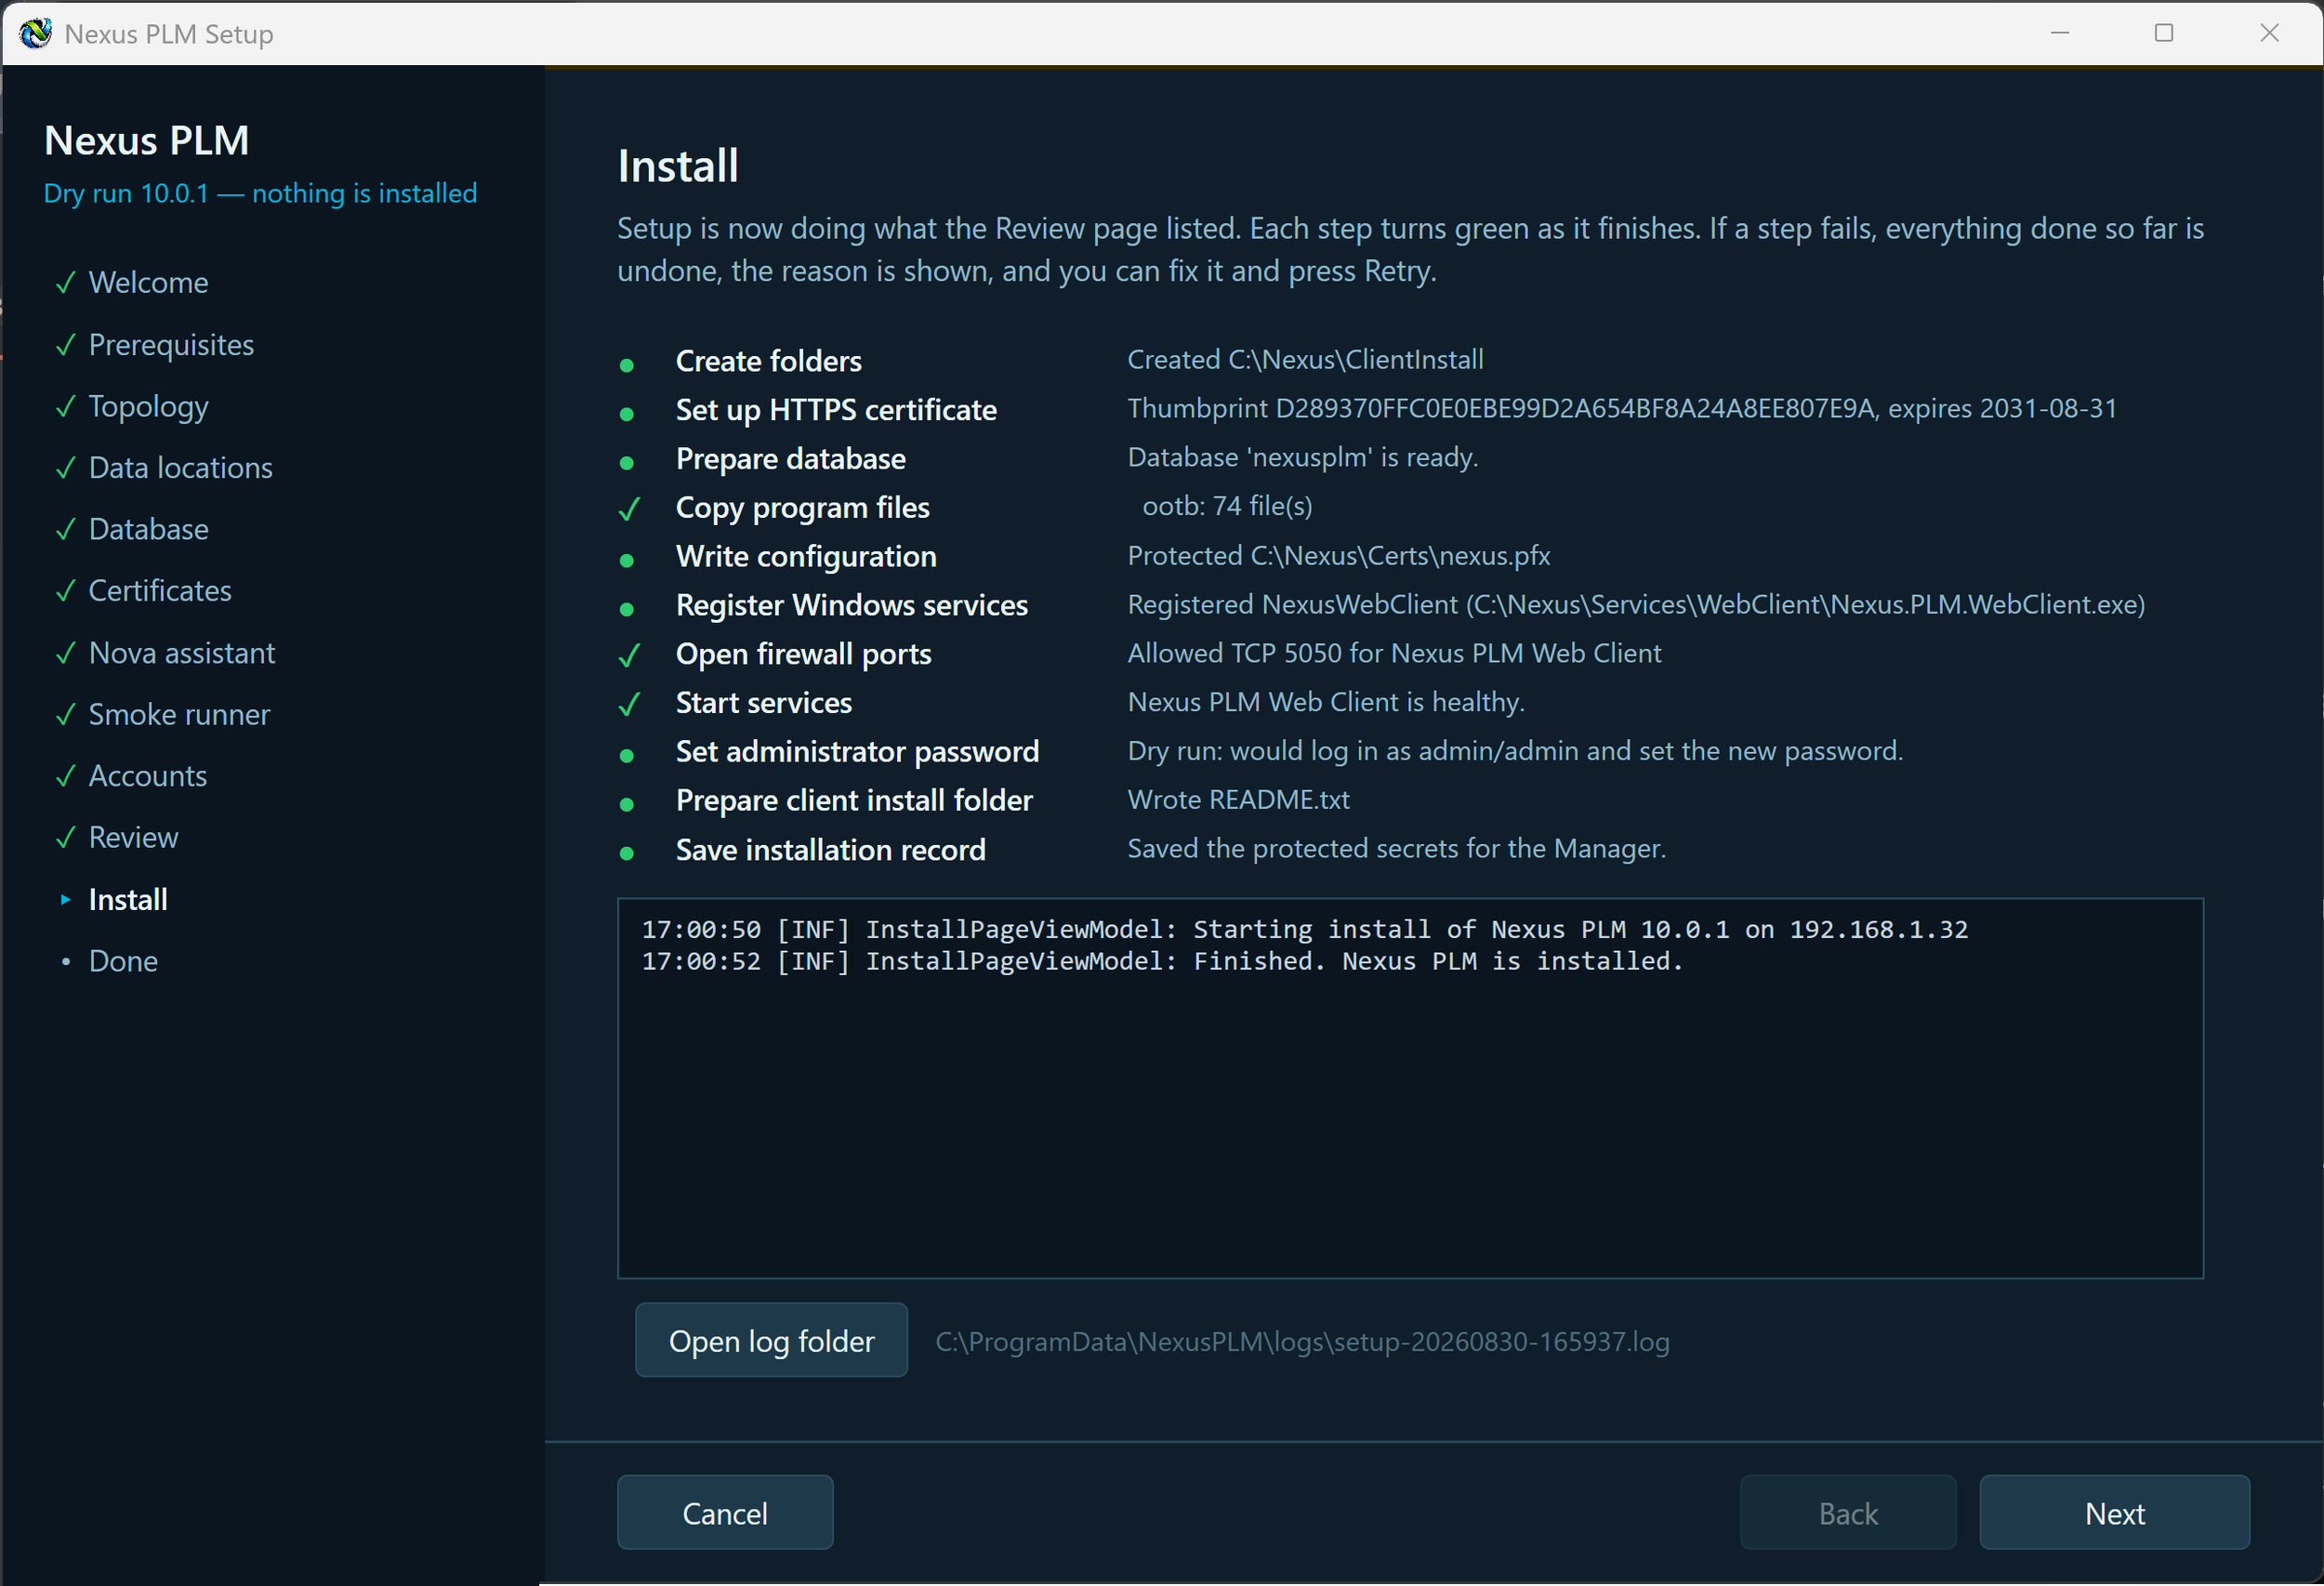
The Install page does the work. It runs the actions from the Review page one at a time and ticks each off as it goes: create the folders, issue the certificate, prepare the database, copy the program files, write the configuration, register the services, open the firewall ports, start the Engine and wait for it to answer, start the remaining services, set the administrator password, export the client files and save the installation plan.
A log scrolls underneath as it works, and the same log is written to disk under C:\ProgramData\NexusPLM\logs, so you can read it later or send it on if you need help.
Mostly you just wait. Starting the Engine the first time takes up to two minutes, because that is when it creates all its database tables - the page has not frozen.
If a step fails, Setup stops there and tells you why in plain language rather than carrying on with a broken installation. Fix the cause, then press Retry step; Open log shows the whole log if you need more detail. If you cancel, Setup undoes what it has already done, in reverse order, so the computer is left as it was.
When every step has a tick, press Next for the Done page.
12 - Done
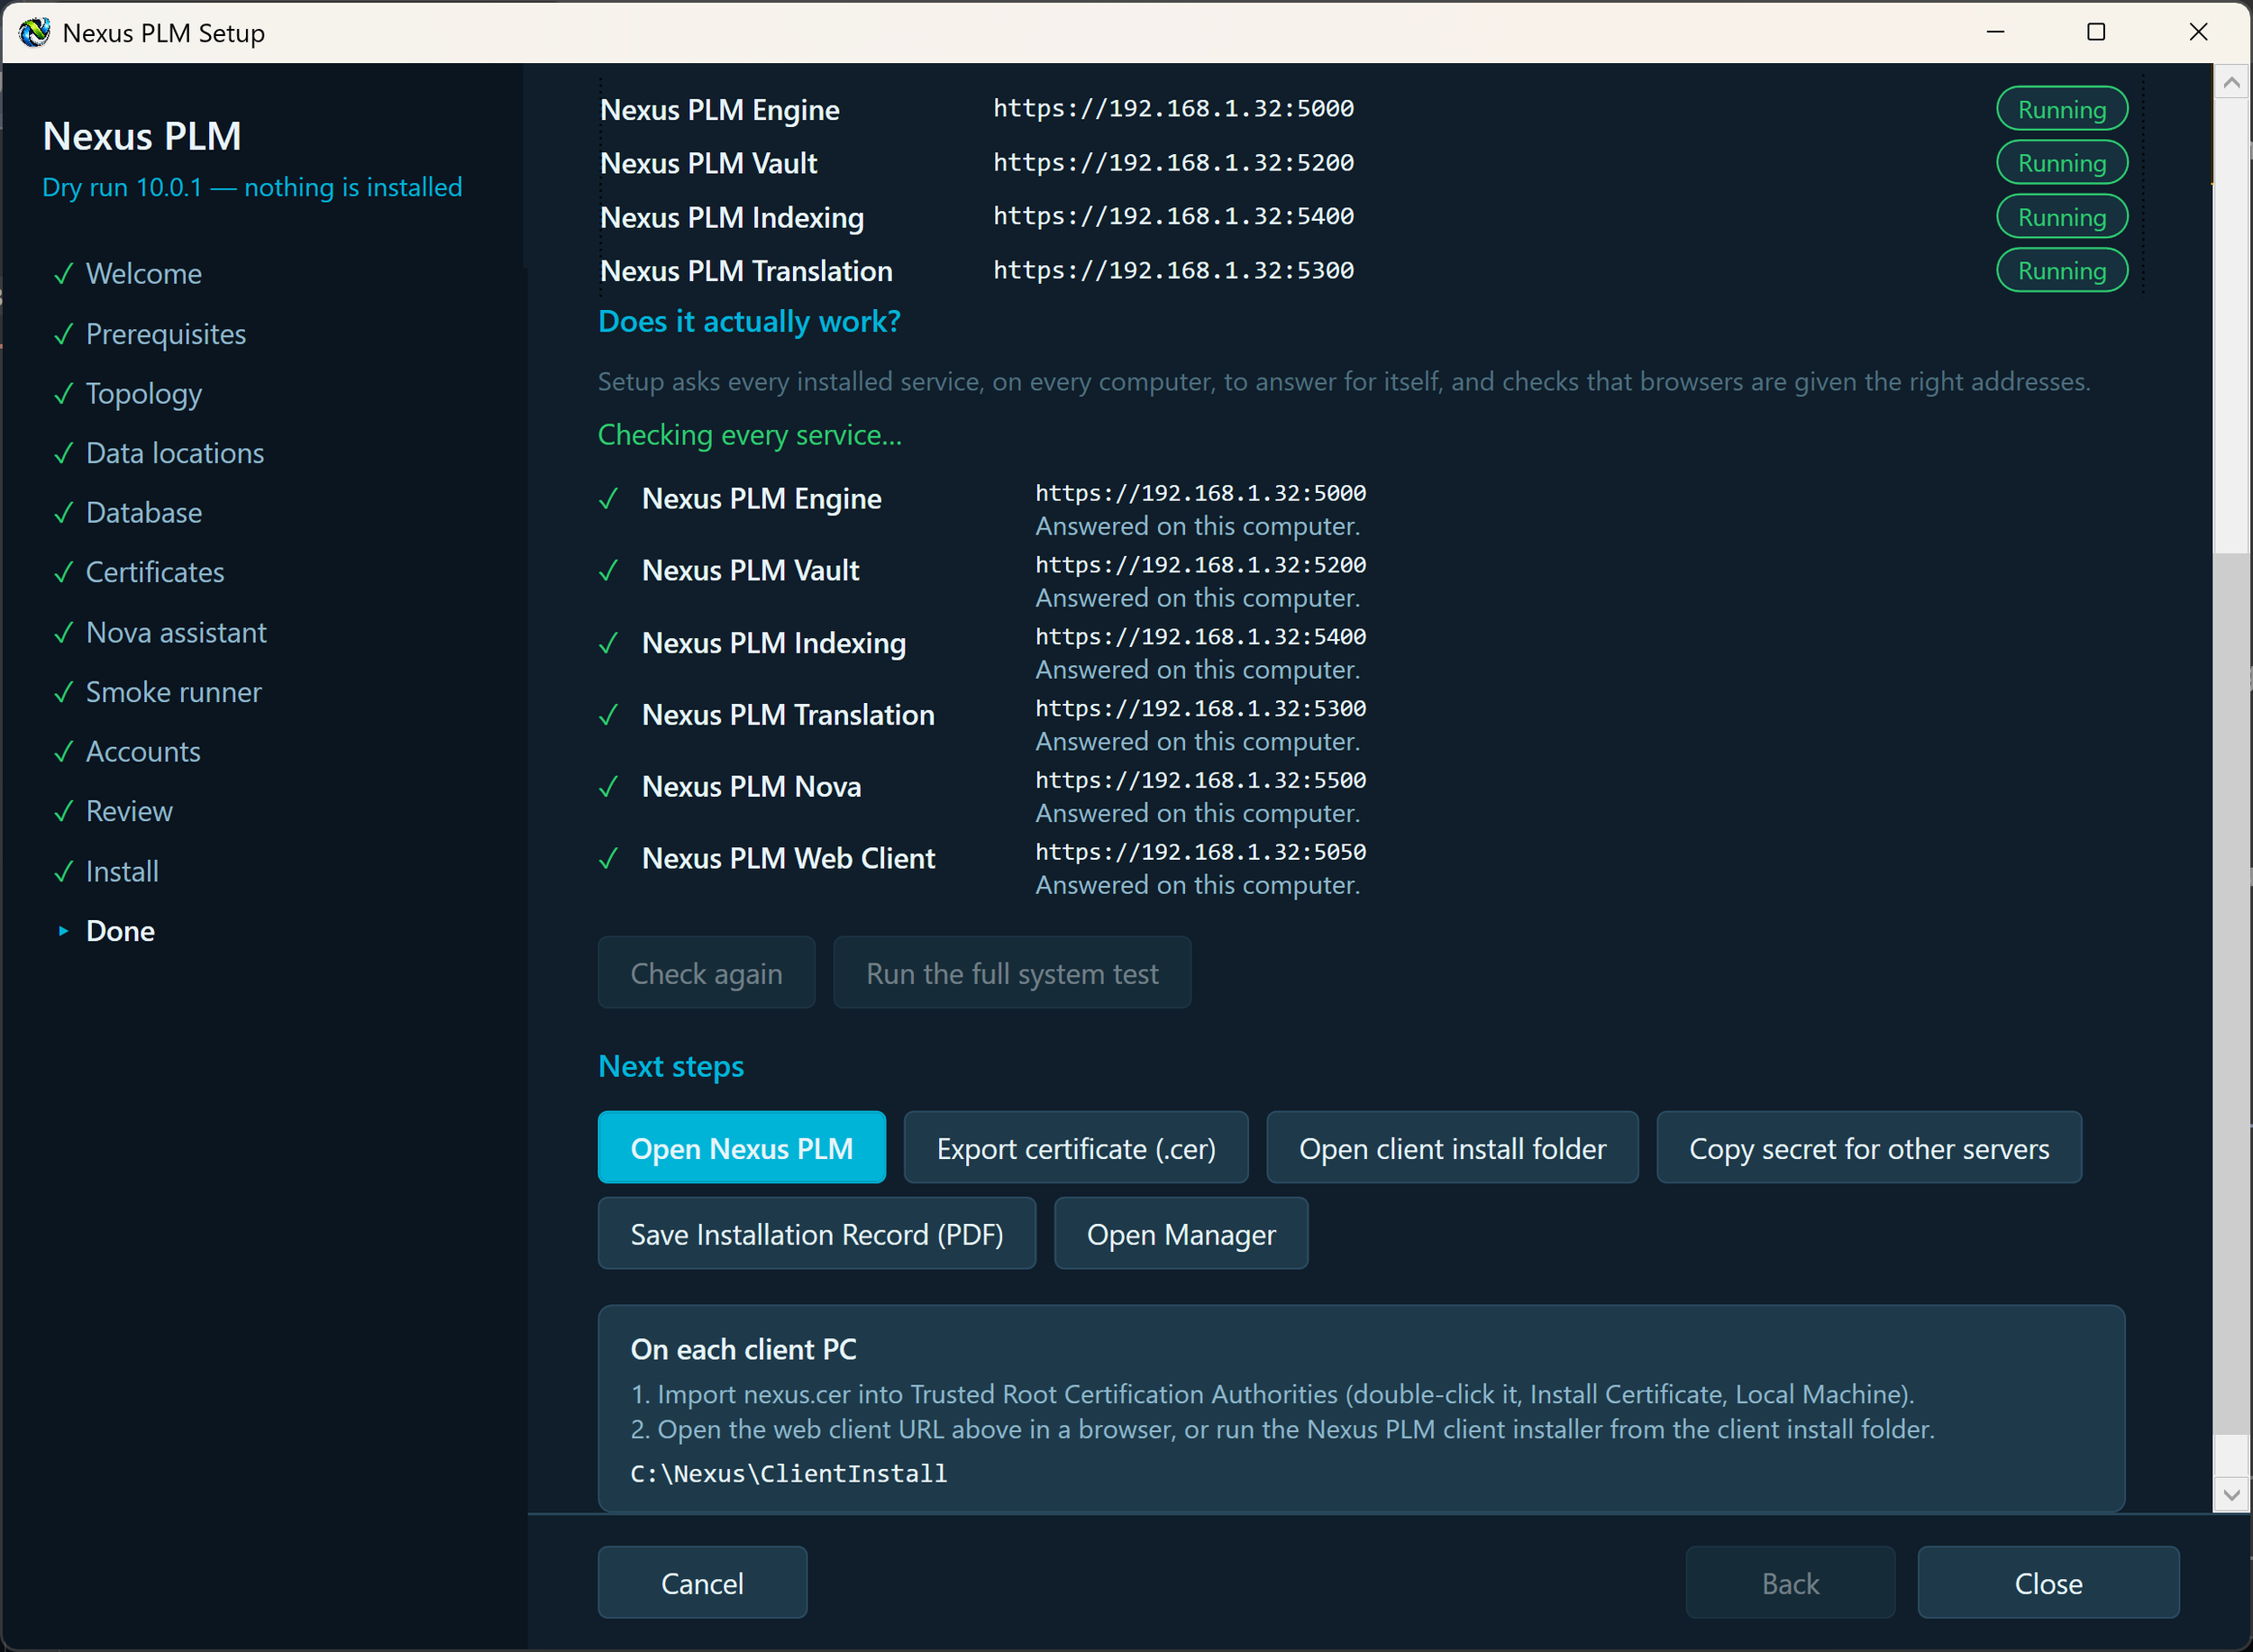
The Done page confirms everything is running and hands you what you need next. It shows the address of your new Nexus PLM website, a status pill for each service, and the buttons that finish the job.
Open Nexus PLM takes you to the site in your browser. Sign in as admin with the password you chose on the Accounts page. If you have not yet trusted the certificate on this computer, the browser will warn you once; accepting it, or importing nexus.cer first, both work.
Export certificate and Open client install folder give you what the client PCs need. Keep the contents of that folder: it holds nexus.cer, which each client PC imports so browsers and the desktop tools trust the server without warnings.
Copy secret for other servers matters only for a multi-server installation. It puts the shared secret on the clipboard; the Setup on the second and later servers asks for it, and it is what lets the services trust one another. Paste it somewhere safe before you close Setup.
Setup also writes an Installation Record into the client install folder: a short PDF listing where everything ended up - which service runs on which computer and port, the data folders, the database, the certificate and its expiry date. It contains no passwords or secrets, so keep it with your IT documentation.
Open Manager launches the same program in its everyday role: service status, start and stop, settings, certificate renewal, backups and future upgrades. It stays installed, so this is where you come back to.
Before any of that, the page checks the installation itself. Under “Does it actually work?” Setup asks every installed service to answer on its own address - including the ones on other computers, which it never touched during the install - and reads the web client’s configuration to confirm browsers are handed those same addresses. Each line turns green as it passes. A line that fails says what to do about it, naming the computer, the port and the firewall rule to open, so a mistyped address or a closed port is caught here rather than by your users next week.
Check again re-runs those checks after you have fixed something, without closing Setup.
Run the full system test goes further. It signs in as the administrator and starts the Deploy Smoke suite on the server: the real website driven in a real browser, signing in, creating a few records and tidying them up again. It takes a few minutes and the result appears on the dashboard of the web client. This needs the Deploy Smoke runner to have been installed earlier; if it was not, Setup says so instead of pretending to test.
That is the installation finished. The next step is the client PCs.